Building an AR app with RealityKit
 Xcode 13 & iOS 15
 Advanced iOS Developers
In 2020 Apple introduced the RealityKit framework to simplify writing Augmented Reality apps. RealityKit pretty much replaces the old SceneKit-based approach of writing AR apps. This tutorial will teach you the basics of creating an AR app with RealityKit by the example of an app to roll a dice in AR.
This is an advanced tutorial for iOS developers. You'll need good knowledge of Swift and SwiftUI to follow along.

Basic AR Setup
-
Use the latest version of Xcode. This tutorial was last tested with Xcode 13 on November 19, 2021.
-
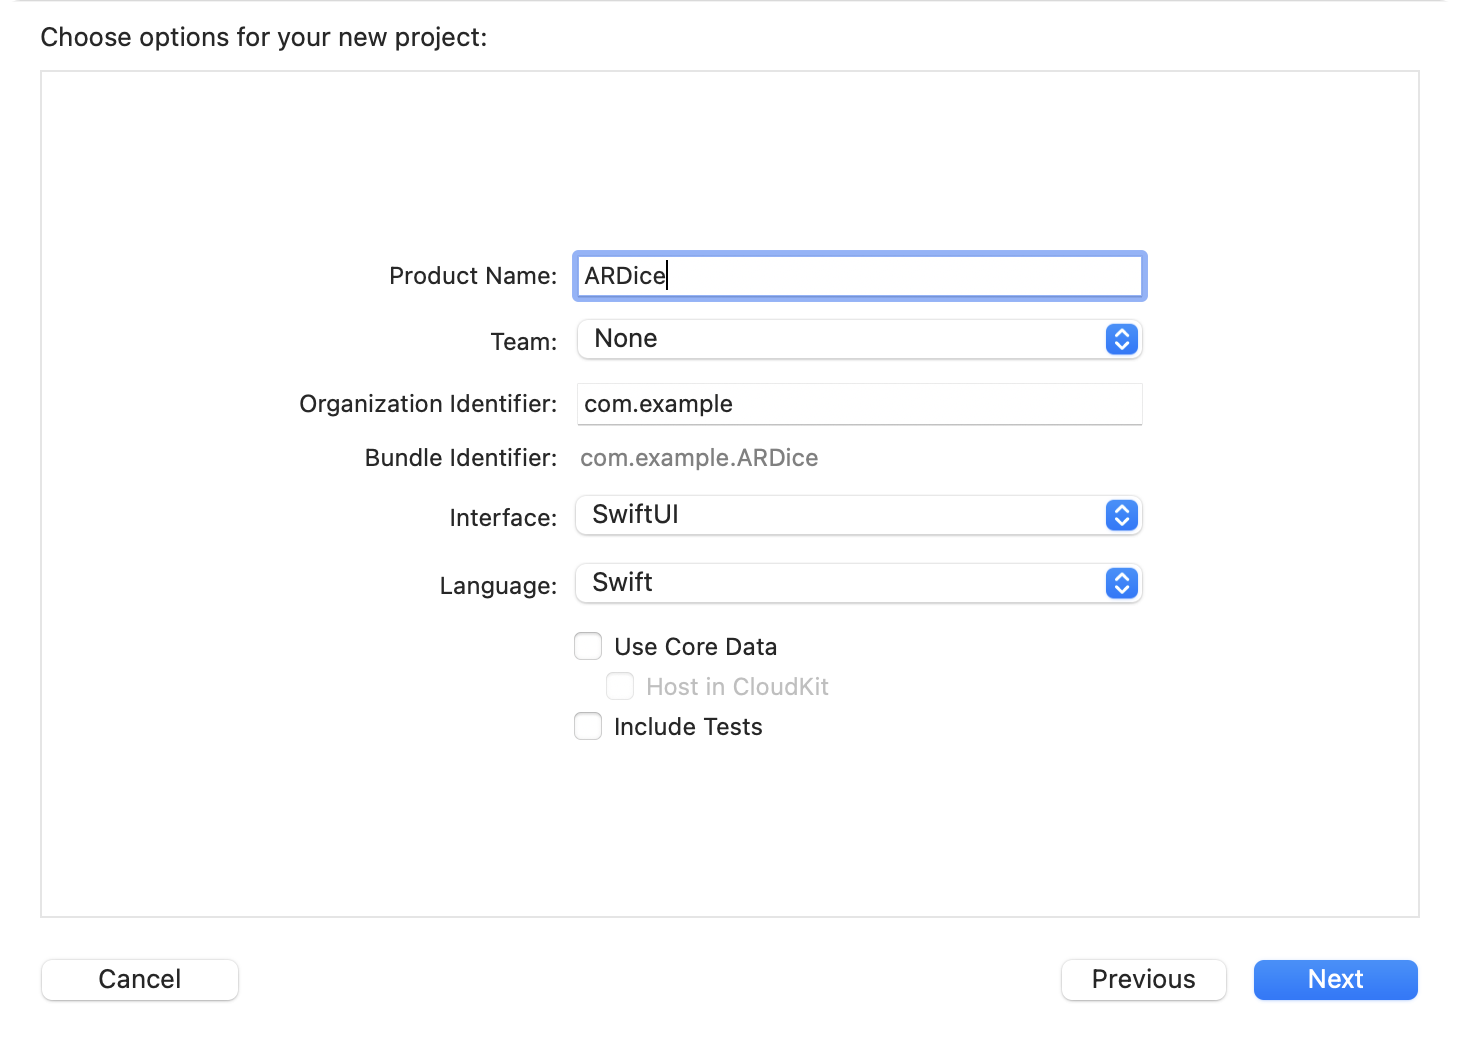
Create a new iOS App project. Pick SwiftUI as interface technology and name the project ARDice:
For real projects, you might want to use the Augmented Reality App template; but for this tutorial, it's better to set up everything from scratch.
-
Open ContentView.swift and create a ↗ UIViewRepresentable struct to wrap an ↗ ARView so we can use it in SwiftUI (currently there is no View provided for RealityKit in SwiftUI). Add it to the ContentView:
import ARKit
import RealityKit
import SwiftUI

struct RealityKitView: UIViewRepresentable {
    func makeUIView(context: Context) -> ARView {
       let view = ARView()
       return view
    }

    func updateUIView(_ view: ARView, context: Context) {
    }
}

struct ContentView: View {
    var body: some View {
        RealityKitView()
    .ignoresSafeArea()
    }
}
-
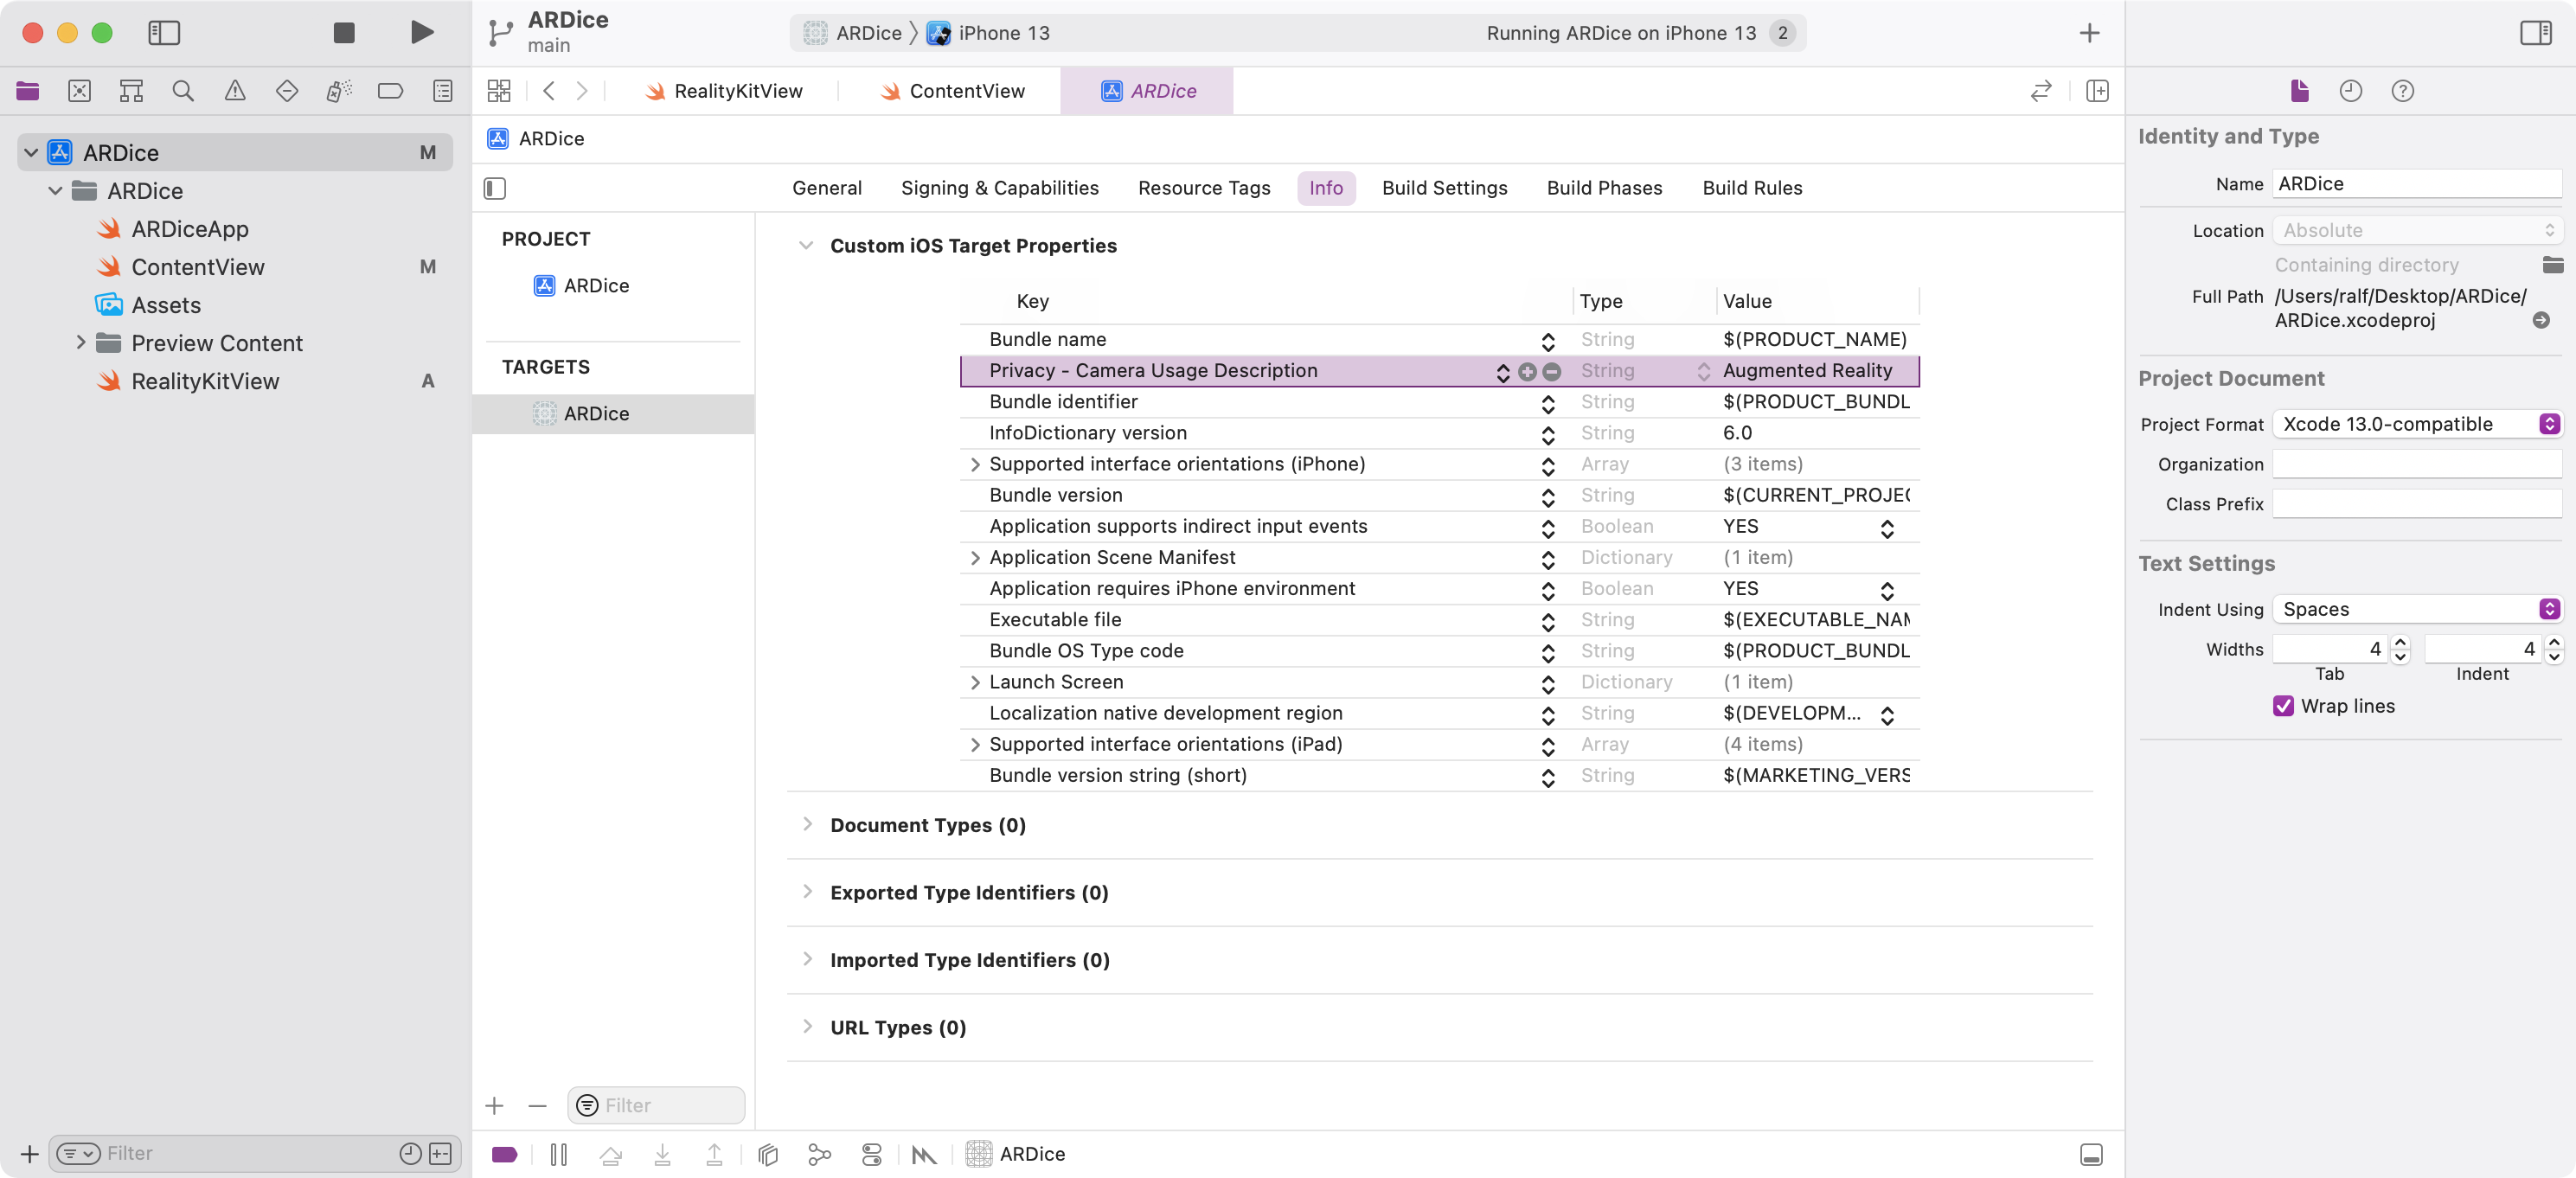
The app needs access to the camera: Open the target configuration and add a Privacy - Camera Usage Description key to the Info.plist. Set a description why the camera is needed:
-
In the makeUIView method, start the AR session and configure it with a ARWorldTrackingConfiguration to automatically detect horizontal planes.
Also add a ARCoachingOverlayView which guides the user until the first plane is found:

It is also a good idea to set some debugOptions so you can get some insight into how the underlying ARKit framework interprets the environment:
import ARKit
import SwiftUI
import RealityKit

struct RealityKitView: UIViewRepresentable {
    func makeUIView(context: Context) -> ARView {
        let view = ARView()

        // Start AR session
let session = view.session
let config = ARWorldTrackingConfiguration()
config.planeDetection = [.horizontal]
session.run(config)

        // Add coaching overlay
let coachingOverlay = ARCoachingOverlayView()
coachingOverlay.autoresizingMask = [.flexibleWidth, .flexibleHeight]
coachingOverlay.session = session
coachingOverlay.goal = .horizontalPlane
view.addSubview(coachingOverlay)

        // Set debug options
#if DEBUG
view.debugOptions = [.showFeaturePoints, .showAnchorOrigins, .showAnchorGeometry]
#endif

        return view
    }

    func updateUIView(_ view: ARView, context: Context) {
    }

}
-
Run the app on an iPhone or iPad (RealityKit will not work in the Simulator).
You should see the coaching overlay (except on devices with a LiDAR sensor, where the plane will be detected so quickly that the overlay might not be visible at all).
You should also see a lot of feature points - these are prominent points which ARKit uses together with sensor data to do world tracking to keep the virtual AR world aligned on top of the camera image.
After a few seconds, a horizontal plane should be detected, and you should see a large green area. For speeding up testing your AR app, it might help to use a surface that has a lot of structure – on plain surfaces, ARKit will have a hard time to find feature points.
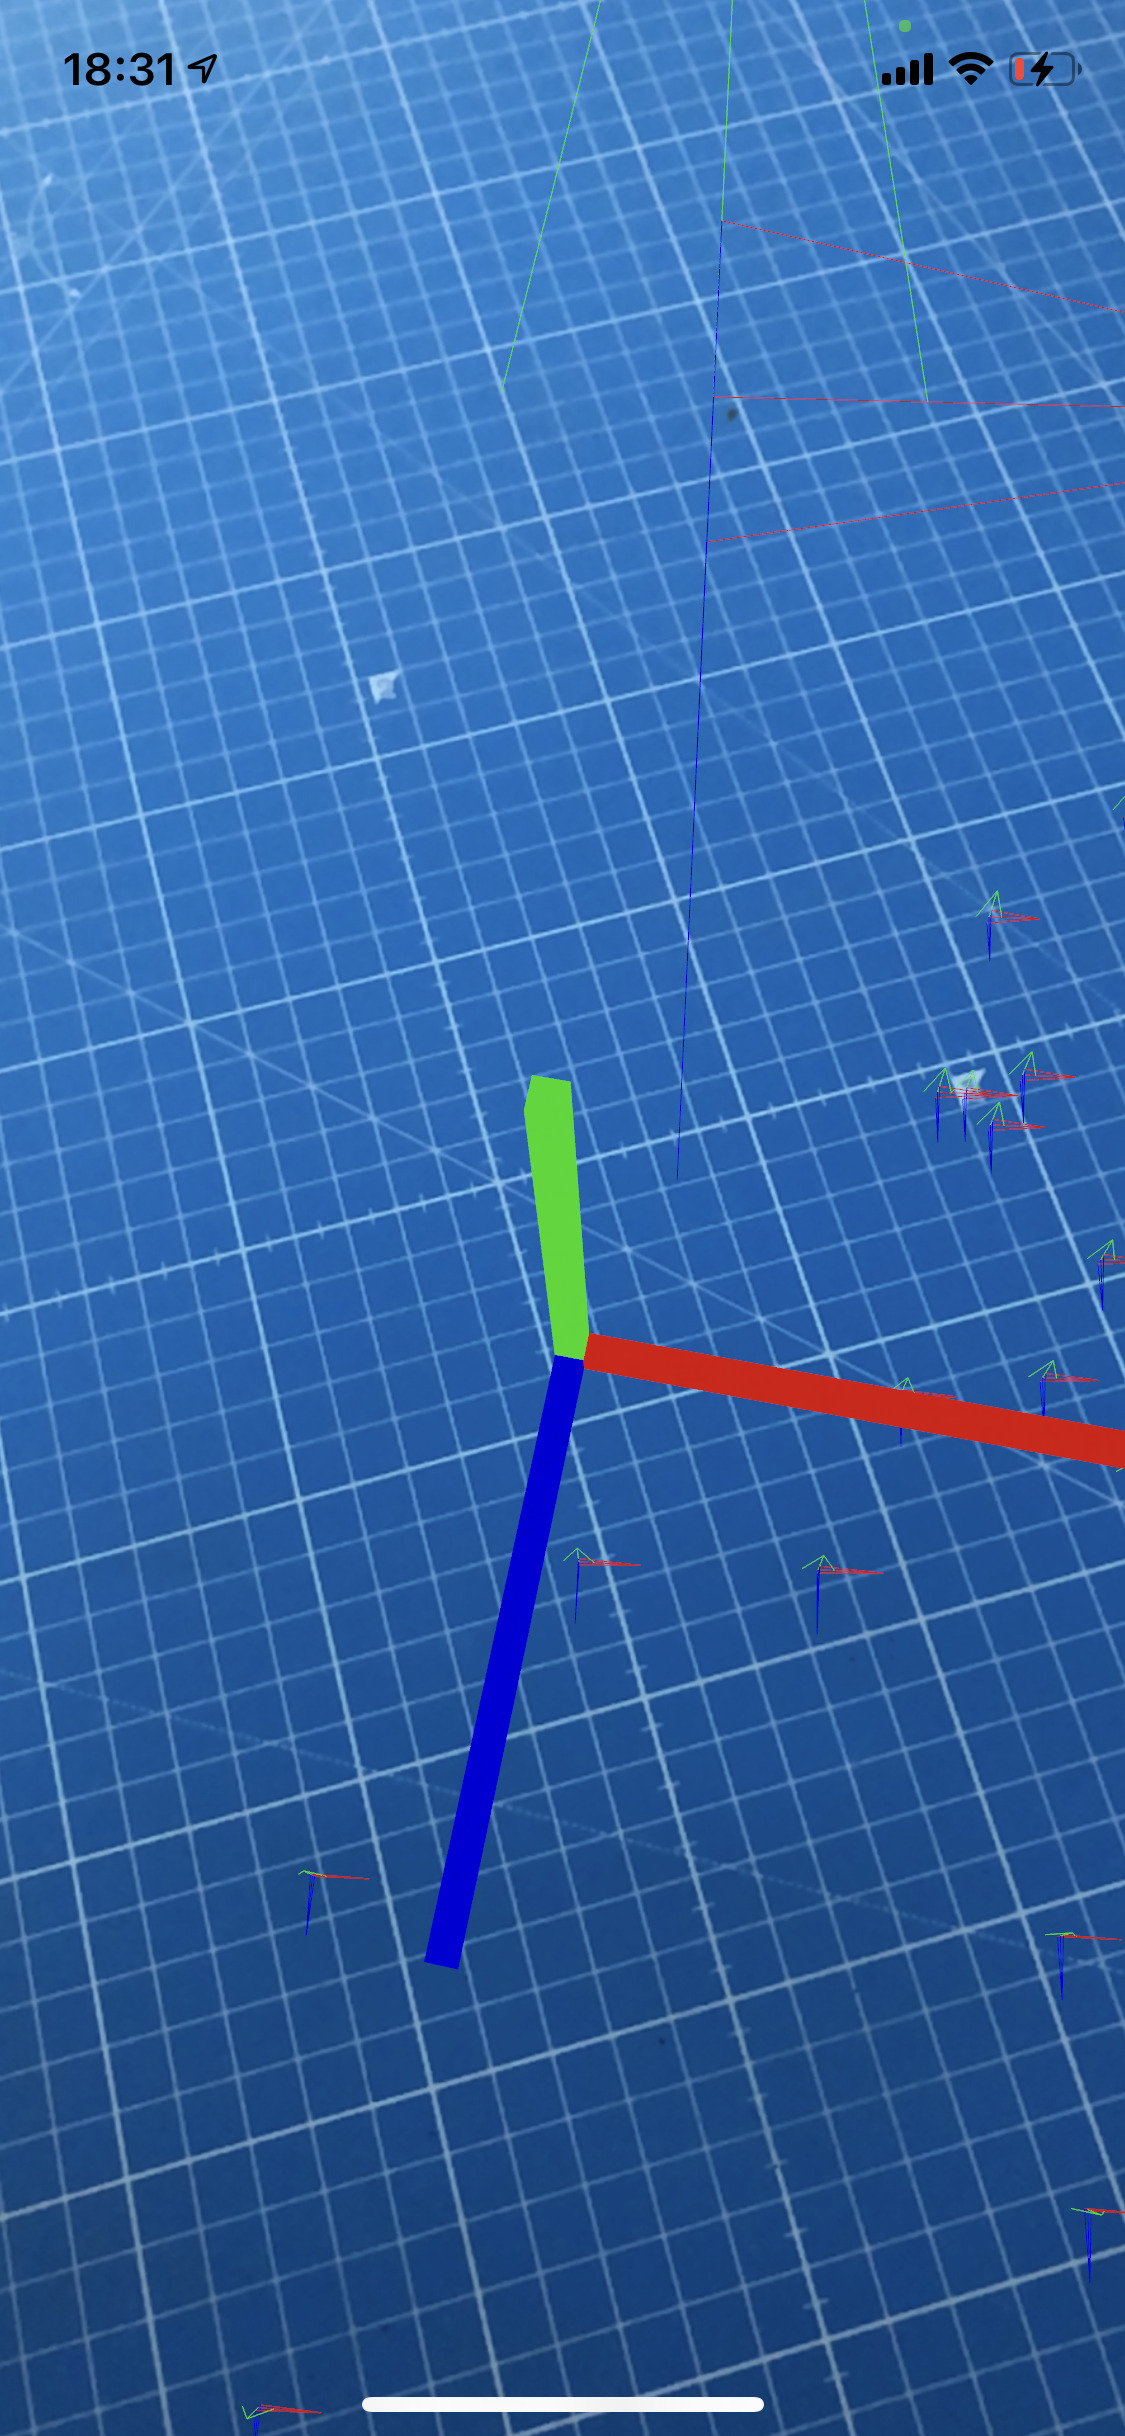
The axes mark the anchorOrigin – that's the center point of the detected horizontal plane anchor. Make yourself familiar with the colors. You can get an idea of the coordinate system that ARKit/RealityKit uses here. The Y axis (green) points up.
Here is a helpful reference of the coordinate system - it might come in handy to know which axis is which direction in the following steps:
Adding a focus cursor
For this example, let's add a 3D cursor that allows to interactively pick a place where the dice should be placed. There is sample code from Apple in the ↗ Placing Objects and Handling 3D Interaction project which ↗ Max Cobb ported to RealityKit and created the handy ↗ FocusEntity Swift package that we'll use in the following steps.
-
In RealityKit there are scenes which are composed of Entities. These are the "objects" of the scene, and can be configured using Components that add behavior and appearance. It might make sense to read the overview documentation for these concepts because they will be used a lot in the following steps:
-
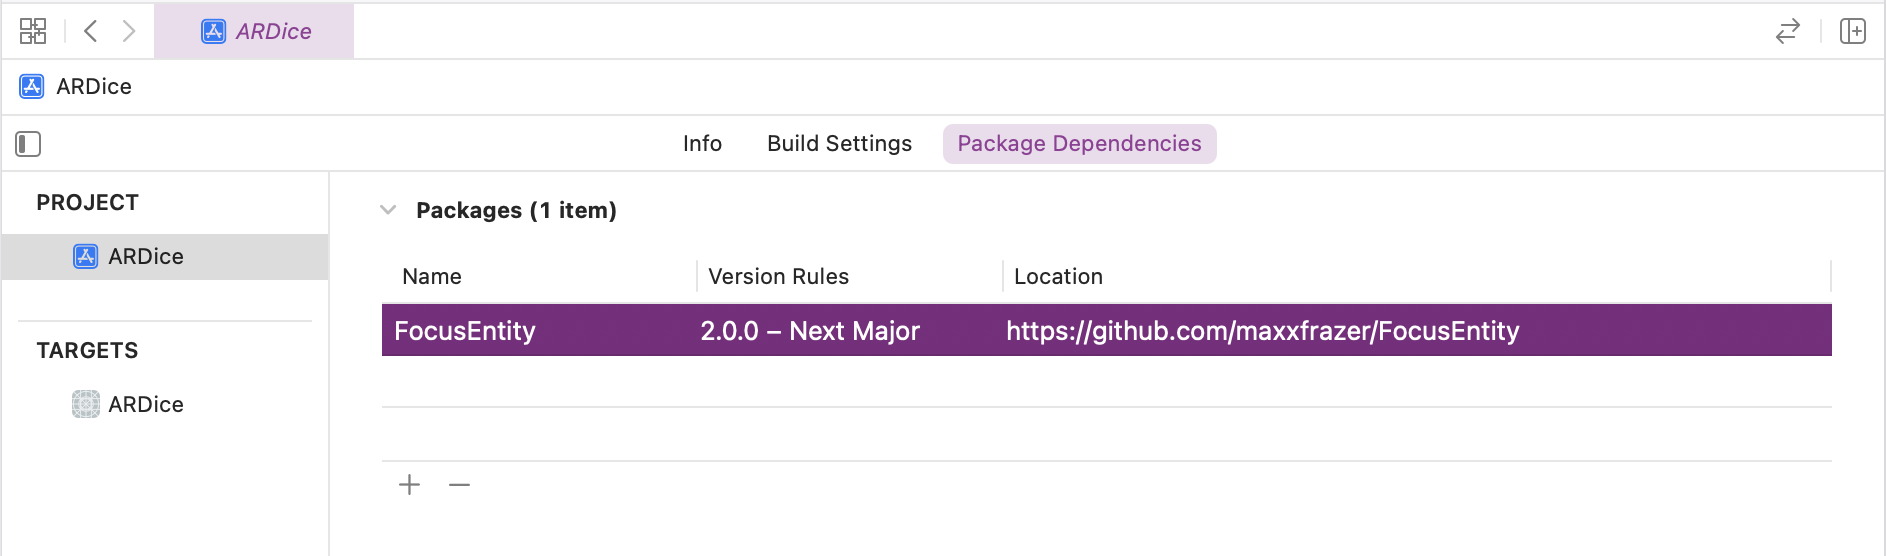
Add the FocusEntity package as a dependency to the project configuration:
https://github.com/maxxfrazer/FocusEntity
-
When a plane is found, an anchor is added to the AR world. We can react to that event with an ↗ ARSessionDelegate. To implement a delegate object in SwiftUI, we need to add a ↗ Coordinator object to the UIViewRepresentable:
import ARKit
import RealityKit
import SwiftUI
import FocusEntity

struct RealityKitView: UIViewRepresentable {
    func makeUIView(context: Context) -> ARView {
        let view = ARView()

        // ...

        // Handle ARSession events via delegate
context.coordinator.view = view
session.delegate = context.coordinator

        return view
    }

    // ...

    func makeCoordinator() -> Coordinator {
    Coordinator()
}

    class Coordinator: NSObject, ARSessionDelegate {
    weak var view: ARView?
    var focusEntity: FocusEntity?

    func session(_ session: ARSession, didAdd anchors: [ARAnchor]) {
        guard let view = self.view else { return }
        debugPrint("Anchors added to the scene: ", anchors)
        self.focusEntity = FocusEntity(on: view, style: .classic(color: .yellow))
    }
}

}
-
Run the app. If you get an error dyld: Library not loaded for the RealityFoundation project, apply this ↗ workaround.
You should see a yellow square focus cursor on the plane (it might be a good idea to disable the debugOptions to see the cursor better).
Placing the dice
-
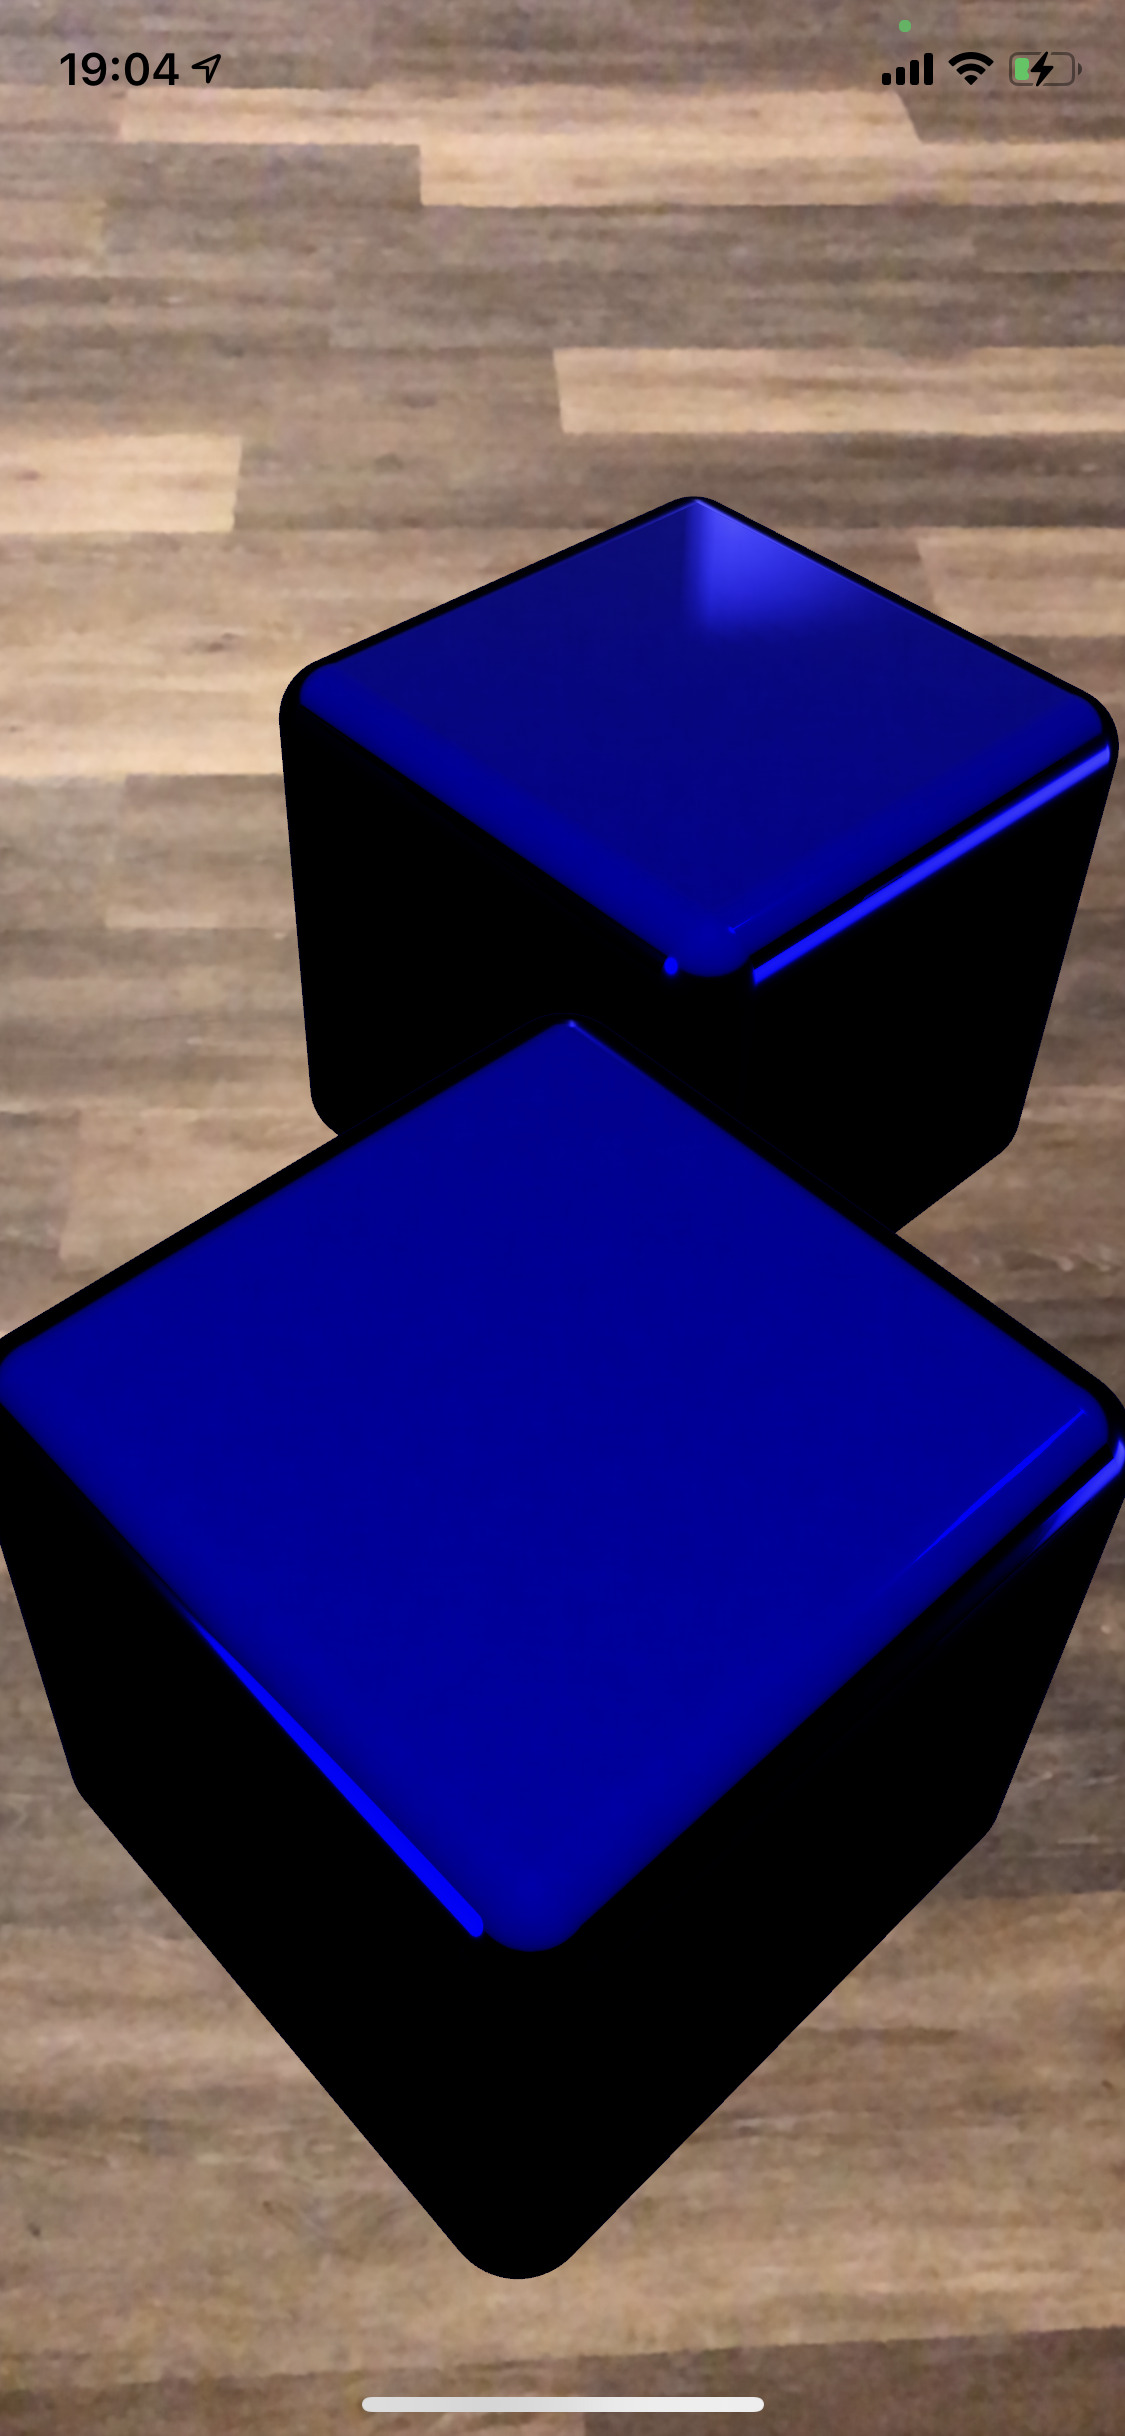
Add a UITapGestureRecognizer to recognize a tap on the ARView and create a blue box at the position of the focus cursor using a ModelEntity:
struct RealityKitView: UIViewRepresentable {
    func makeUIView(context: Context) -> ARView {
        let view = ARView()

        // ...

        // Handle taps
view.addGestureRecognizer(
    UITapGestureRecognizer(
        target: context.coordinator,
        action: #selector(Coordinator.handleTap)
    )
)

        return view
    }

    // ...

    class Coordinator: NSObject, ARSessionDelegate {
        // ...

        @objc func handleTap() {
    guard let view = self.view, let focusEntity = self.focusEntity else { return }

    // Create a new anchor to add content to
    let anchor = AnchorEntity()
    view.scene.anchors.append(anchor)

    // Add a Box entity with a blue material
    let box = MeshResource.generateBox(size: 0.5, cornerRadius: 0.05)
    let material = SimpleMaterial(color: .blue, isMetallic: true)
    let diceEntity = ModelEntity(mesh: box, materials: [material])
    diceEntity.position = focusEntity.position

    anchor.addChild(diceEntity)
}

    }

}
-
Run the app and check that placing the boxes works as expected. You should get boxes that are 0,5 meters tall:
-
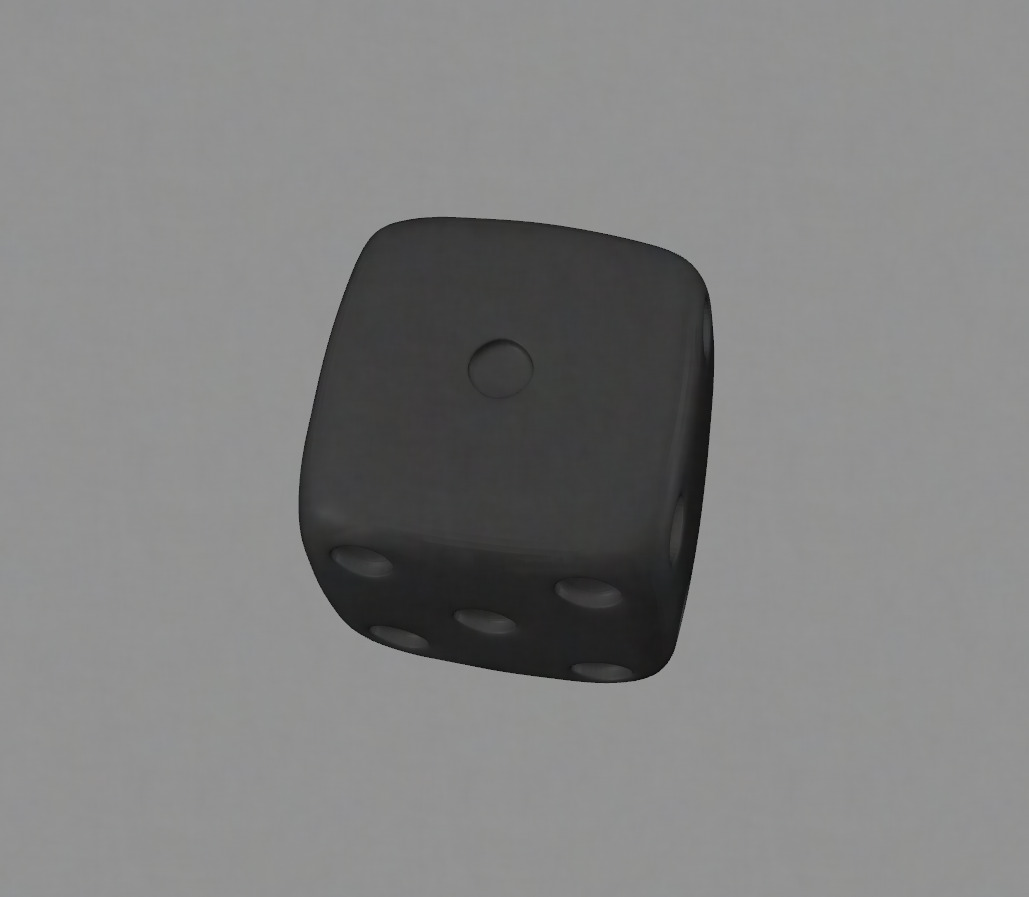
Let's add a 3D model of an actual dice to the project. RealityKit will only load ↗ .usdz files. You can download a converted model file here: Dice.zip.
I have choosen the ↗ original dice model because it is available under the Creative commons license. Converting 3d models can be a bit tricky: The ↗ Reality Converter app can write the USDZ format, but here I needed to use Blender to convert the original .stl file to the .glb format to import it in the Reality Converter app.
-
Add the Dice.usdz model to your Xcode project, remove the code to generate the Box mesh and load the model instead and scale it down a bit:
// Add a dice entity
let diceEntity = try! ModelEntity.loadModel(named: "Dice")
diceEntity.scale = [0.1, 0.1, 0.1]
diceEntity.position = focusEntity.position
-
Run the app and check that the dice appears on tap.
Rolling the dice
-
Let's enable the Physics simulation for the dice, so we can actually roll it:
After loading the dice model, determine the size of the dice (this need to be the unscaled size, that's why relativeTo: diceEntity is used):
let size = diceEntity.visualBounds(relativeTo: diceEntity).extents
Create a box and set it as CollisionComponent so RealityKit can quickly check for collisions:
let boxShape = ShapeResource.generateBox(size: size)
diceEntity.collision = CollisionComponent(shapes: [boxShape])
Enable the physics simulation by setting a PhysicsBodyComponent:
diceEntity.physicsBody = PhysicsBodyComponent(
    massProperties: .init(shape: boxShape, mass: 50),
    material: nil,
    mode: .dynamic
)
-
Hint: You can add the .showPhysics option to the debugOptions to see the outline of the collision body in the scene:
view.debugOptions = [.showAnchorOrigins, .showPhysics]
-
Launch the app. You should see that the die falls down because there is no ground surface.
-
As a workaround, let's add a plane below the dice so it cannot fall down:
// Create a plane below the dice
let planeMesh = MeshResource.generatePlane(width: 2, depth: 2)
let material = SimpleMaterial(color: .init(white: 1.0, alpha: 0.1), isMetallic: false)
let planeEntity = ModelEntity(mesh: planeMesh, materials: [material])
planeEntity.position = focusEntity.position
planeEntity.physicsBody = PhysicsBodyComponent(massProperties: .default, material: nil, mode: .static)
planeEntity.collision = CollisionComponent(shapes: [.generateBox(width: 2, height: 0.001, depth: 2)])
planeEntity.position = focusEntity.position
anchor.addChild(planeEntity)
-
To actually roll the dice, keep the instance of the diceEntity, and on a second tap, add some random force and torque to it:
diceEntity.addForce([0, 2, 0], relativeTo: nil)
diceEntity.addTorque([Float.random(in: 0 ... 0.4), Float.random(in: 0 ... 0.4), Float.random(in: 0 ... 0.4)], relativeTo: nil)
-
Run the app and roll the dice by tapping it:
More information
-
RealityKitFramework documentation for RealityKit.
-
ARWorldTrackingConfigurationThe documentation about the ARWorldTrackingConfiguration describes many powerful features of ARKit such as the ability to automatically detect images, 3D shapes or AppClip codes.
 Blog
Blog Subscribe
 Example project