UITableViewController
 UIKit, Xcode 13 & iOS 15
 Developers without prior iOS knowledge
This tutorial demonstrates common use cases for the UITableView and UITableViewController classes.
Configure table contents using the Storyboard:
Provide section and row content programmatically:
Configure cells using cell styles:
Making table cells reorderable:
Requirements
For this tutorial you need basic programming skills and know how to use Xcode.
Creating an example project
-
Run Xcode and create a new project with File » New » Project ⌘⇧N. Select iOS » Application » App:

-
Name the app “Countries”.
Choose Swift as Language, select Storyboard for User Interface.
-
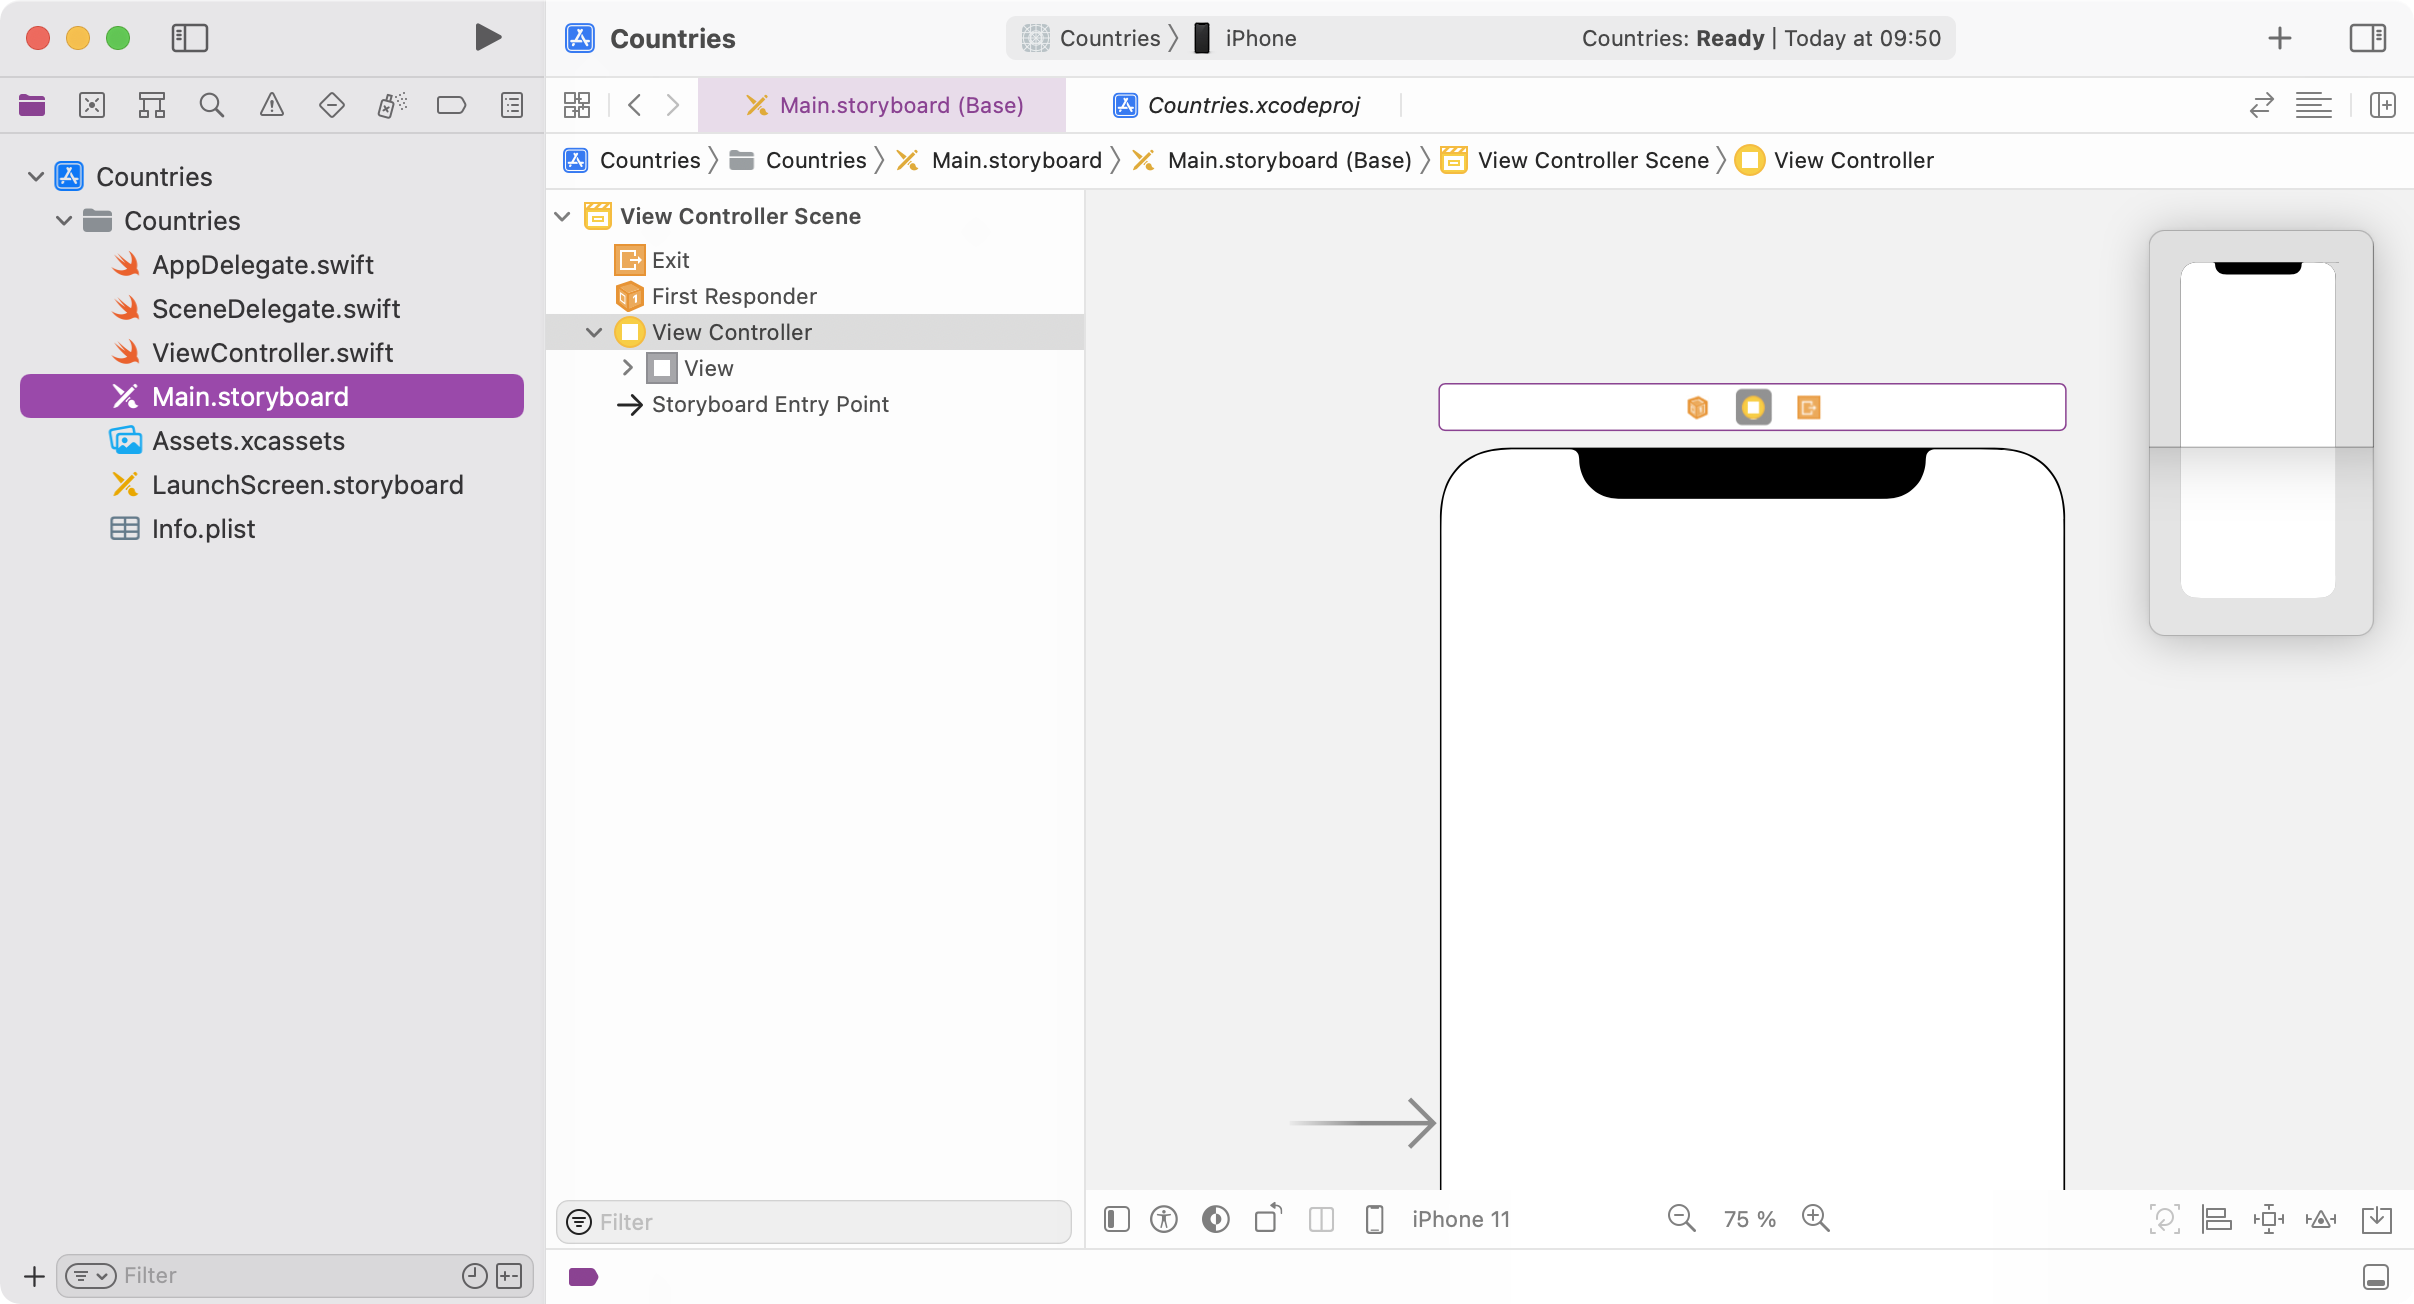
Use Edit » Delete ⌘⌫ to remove the existing controller from the storyboard.
-
Also remove the existing source code file ViewController.swift (confirm the deletion with 'Move to Trash' to also delete the file from the project folder).
Configure table contents using the Storyboard
-
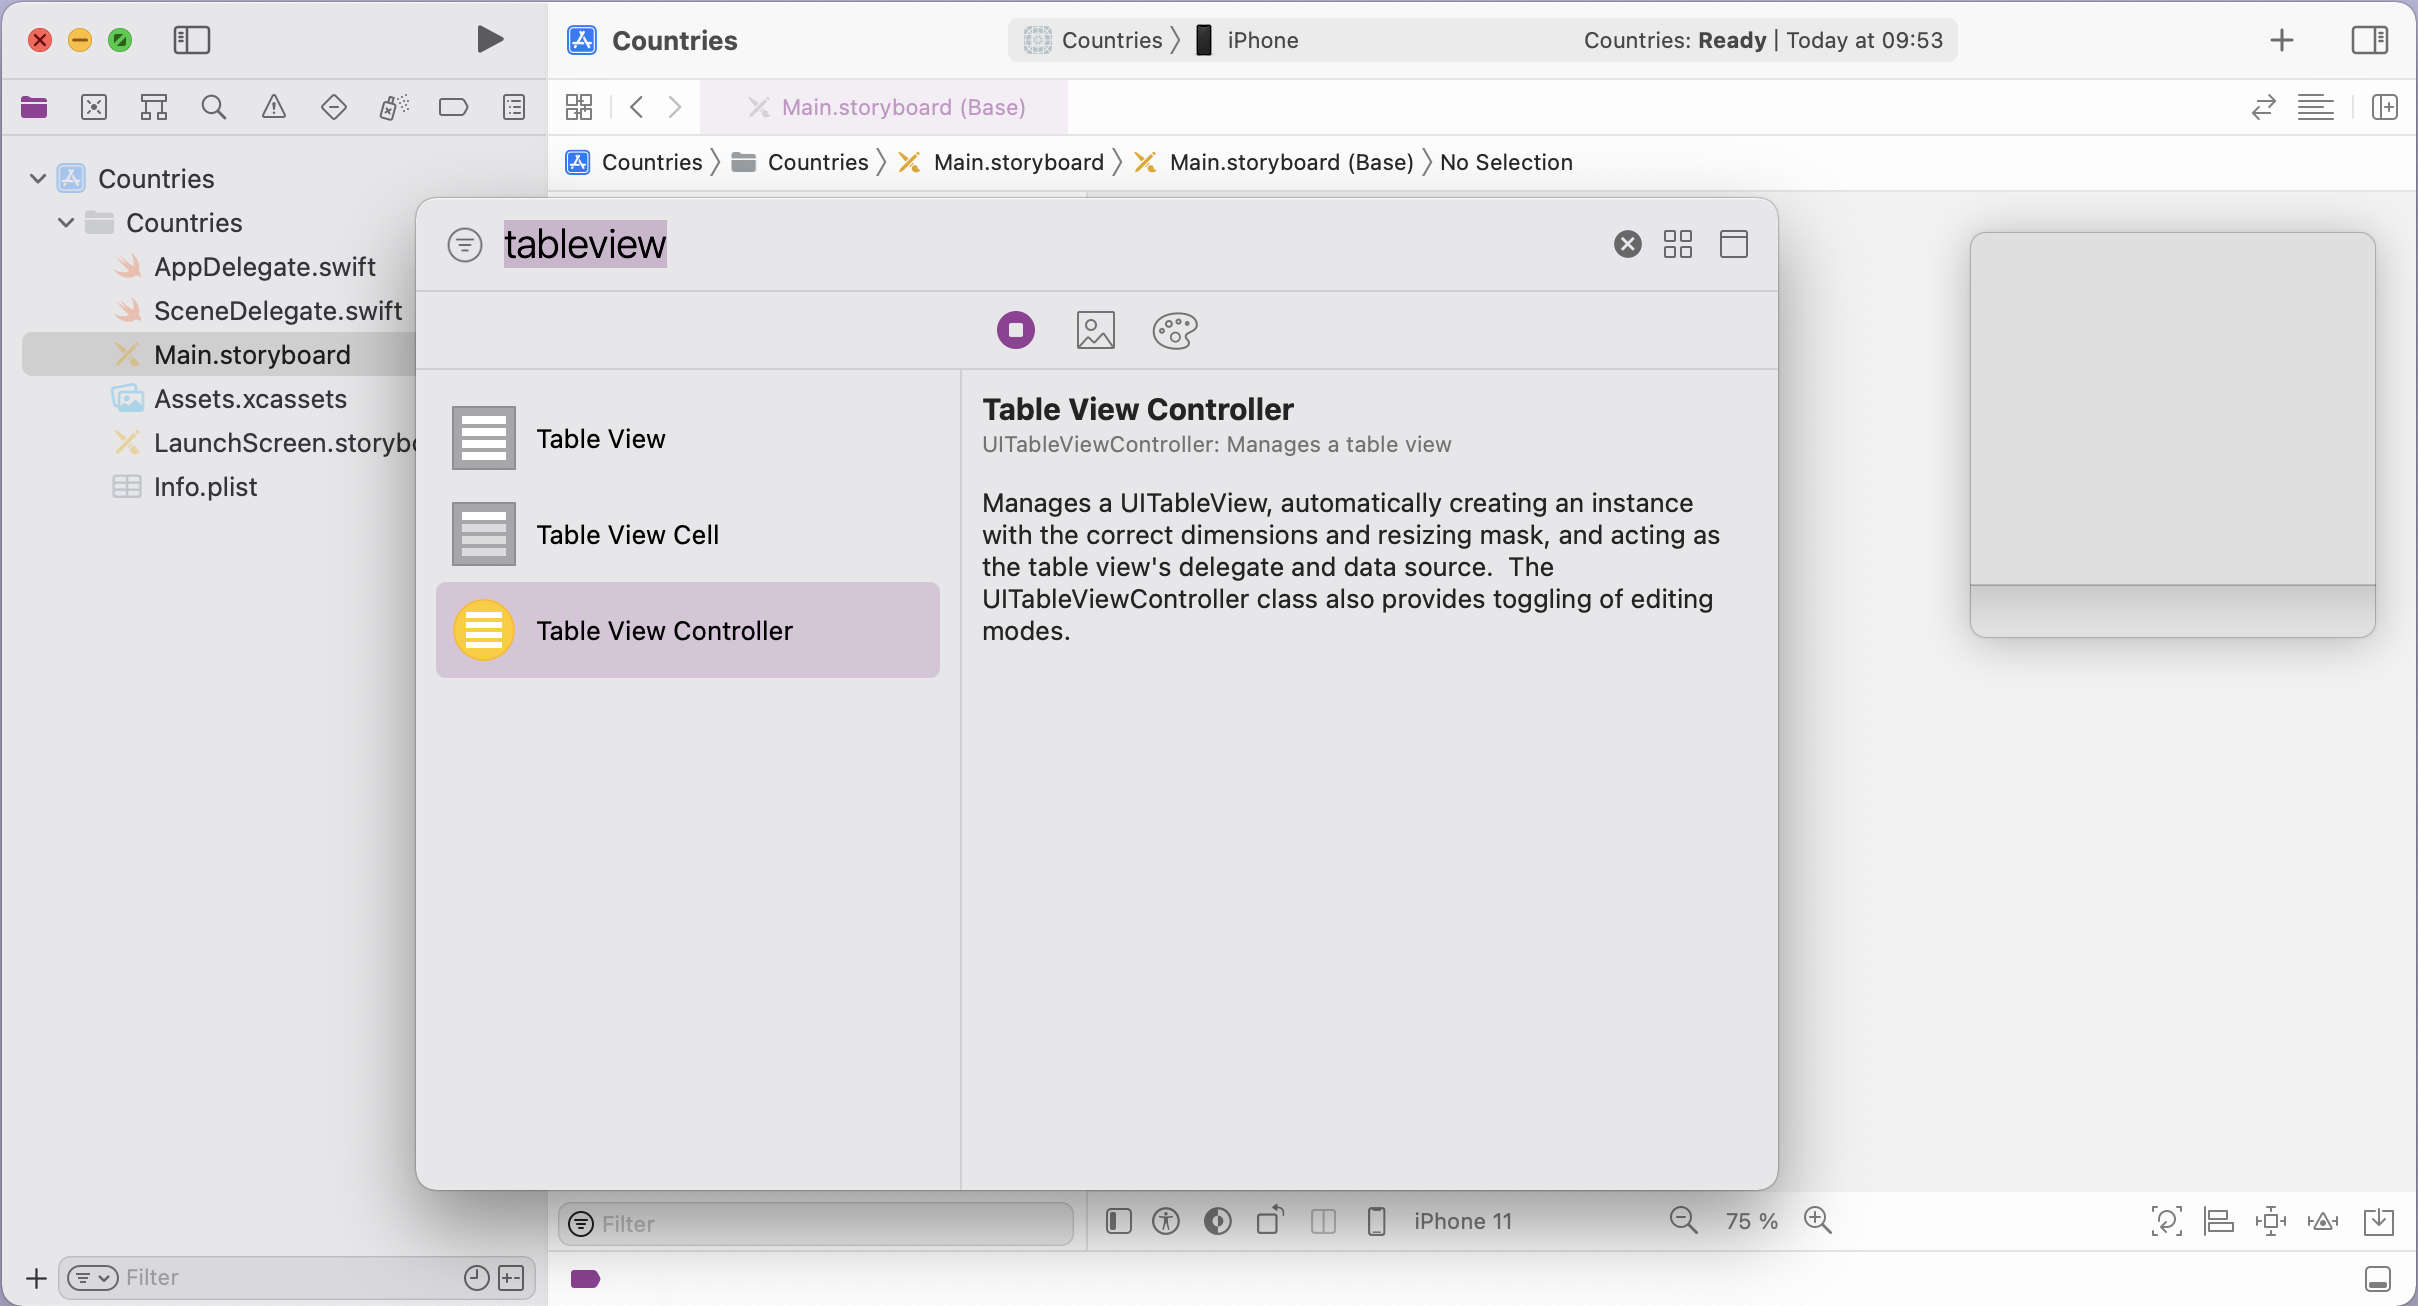
Open Main.storyboard and drag in a new Table View Controller from the Object Library:
-
Select the controller and configure the controller as Initial View Controller:
-
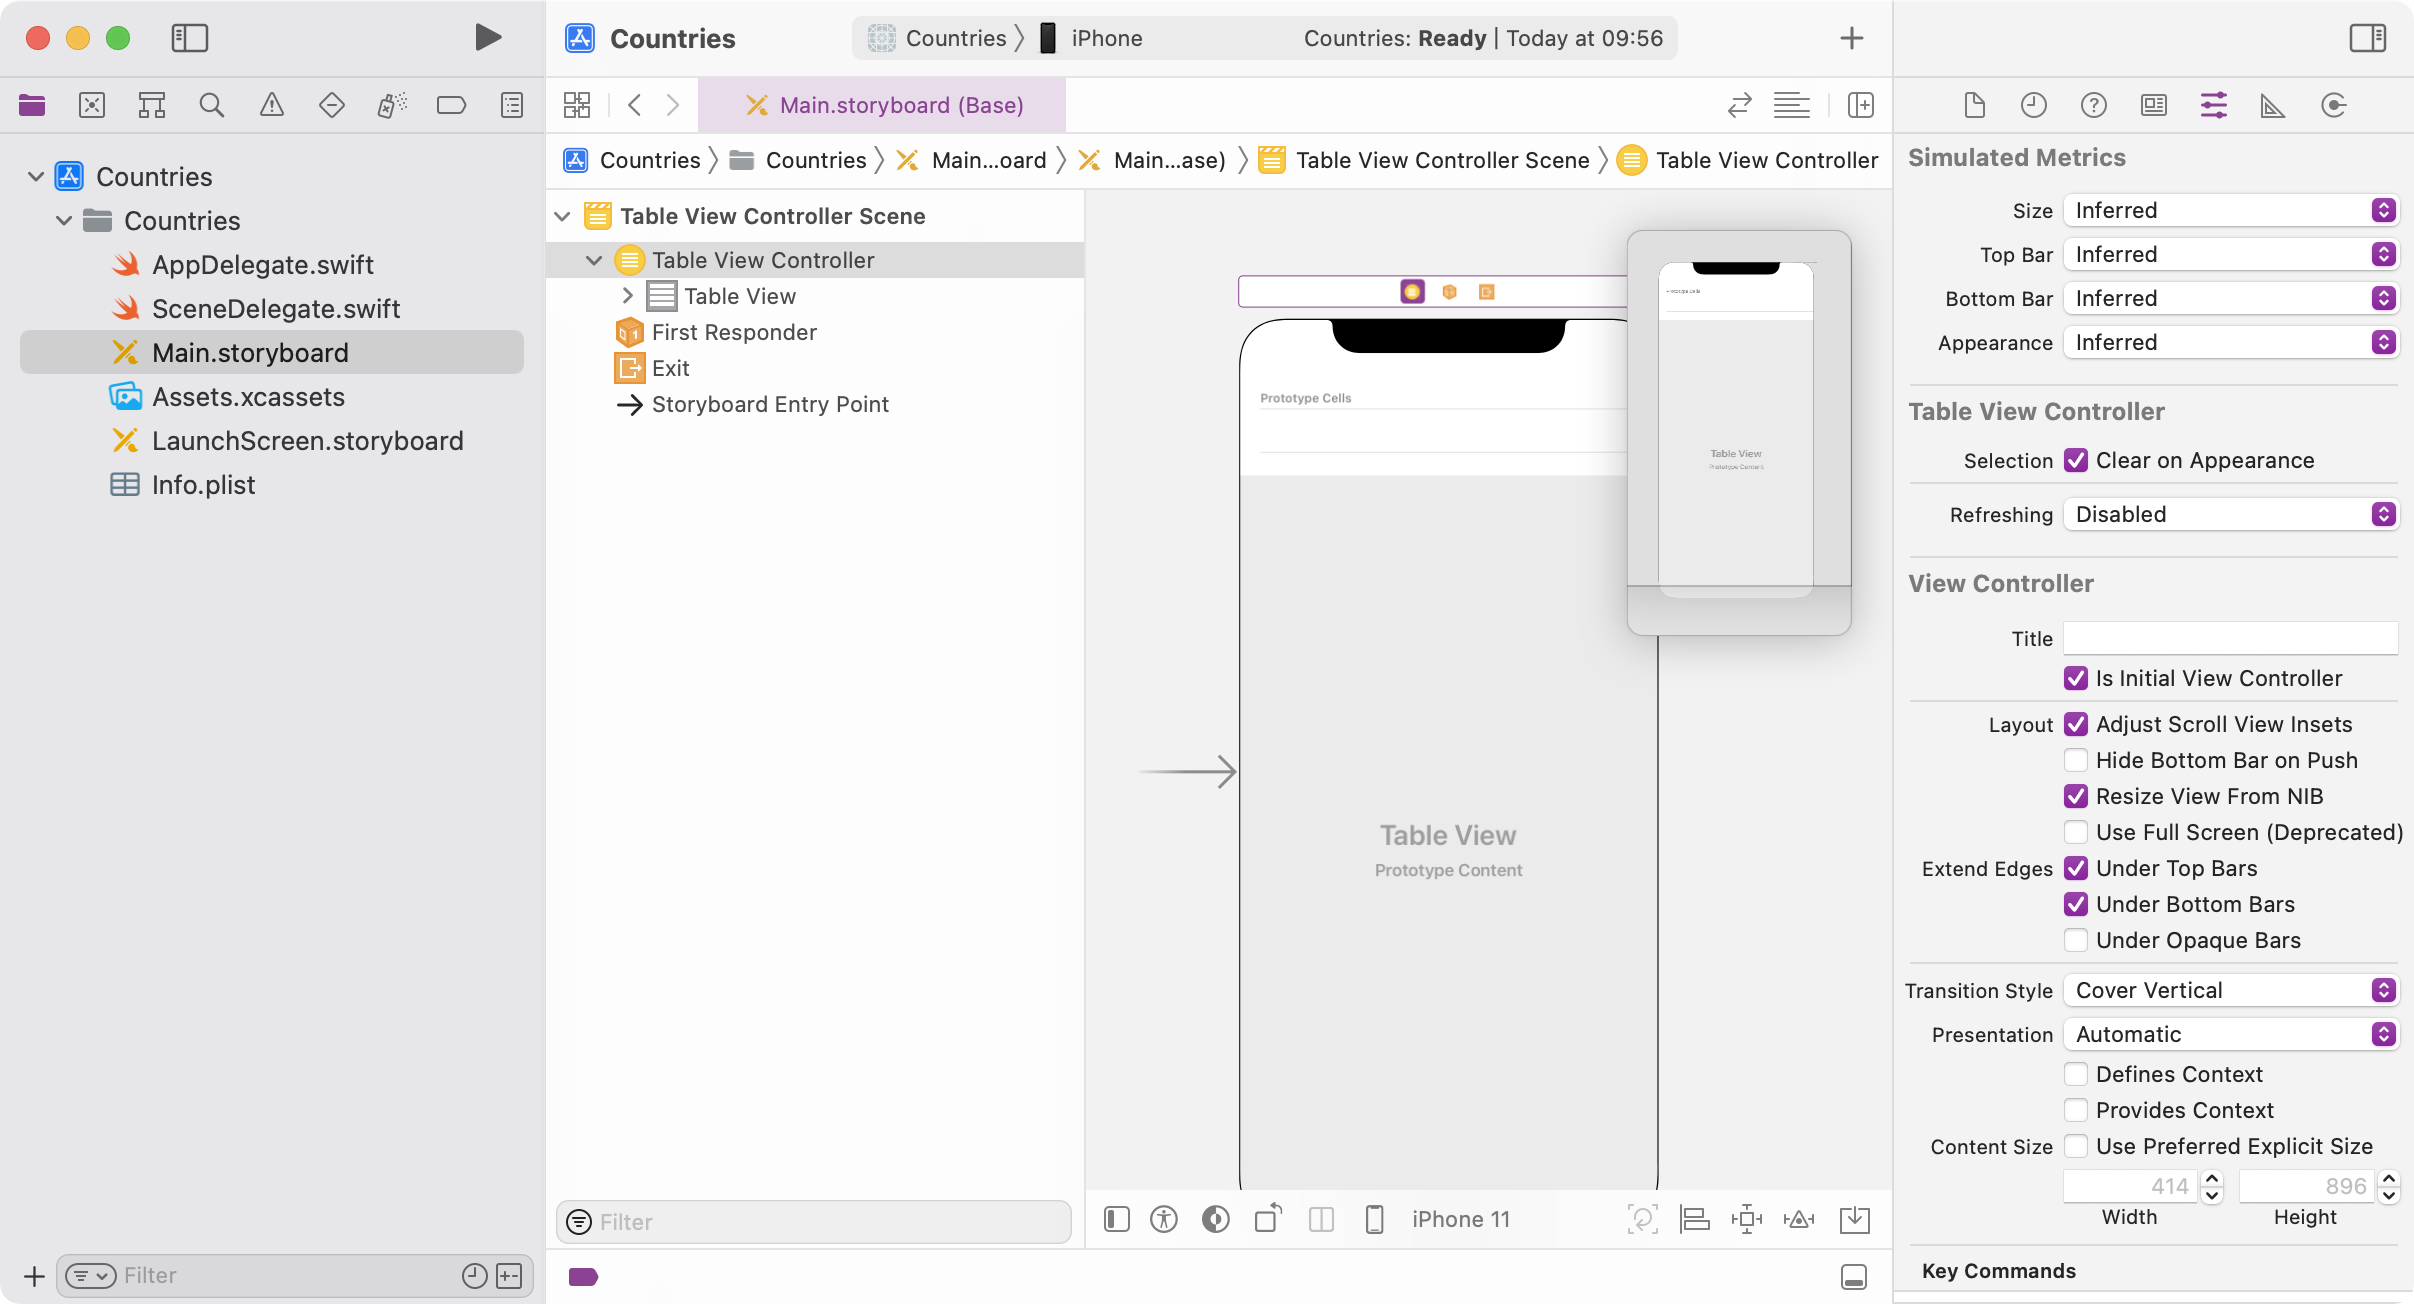
Shift-Click on the table to see all objects at that position and select Table View:
-
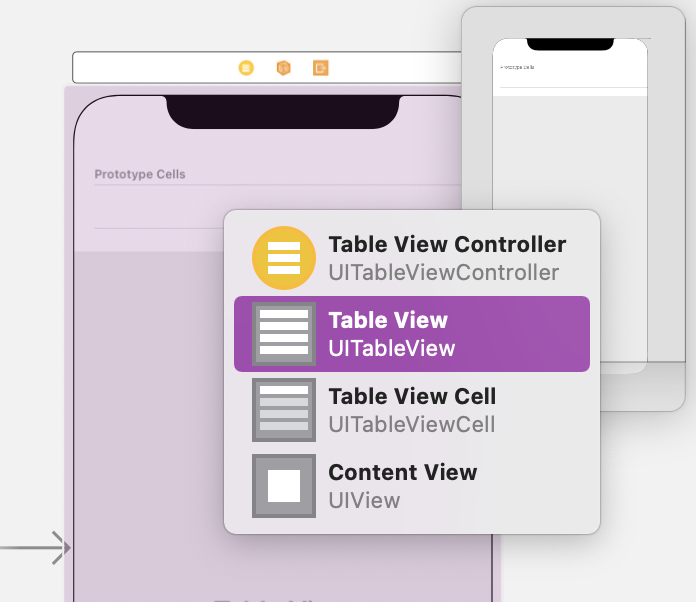
In the Attributes Inspector configure Static Cells for Content to configure the table cells in the storyboard instead of writing code to provide the data. Set the Style of the Table View to Grouped:
-
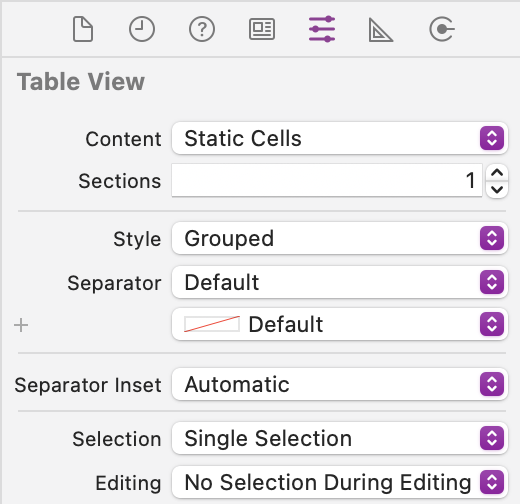
Show the Document Outline and familiarize yourself with the object structure. The Table View Controller manages its Table View consisting of Table View Cells and an empty Content View in the cell:
-
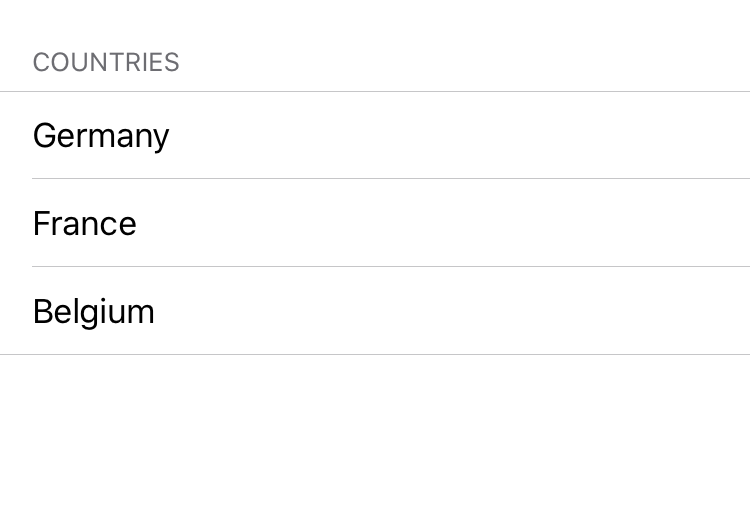
Select the section using the outline or with Shift + Click. Set Countries as Header text:
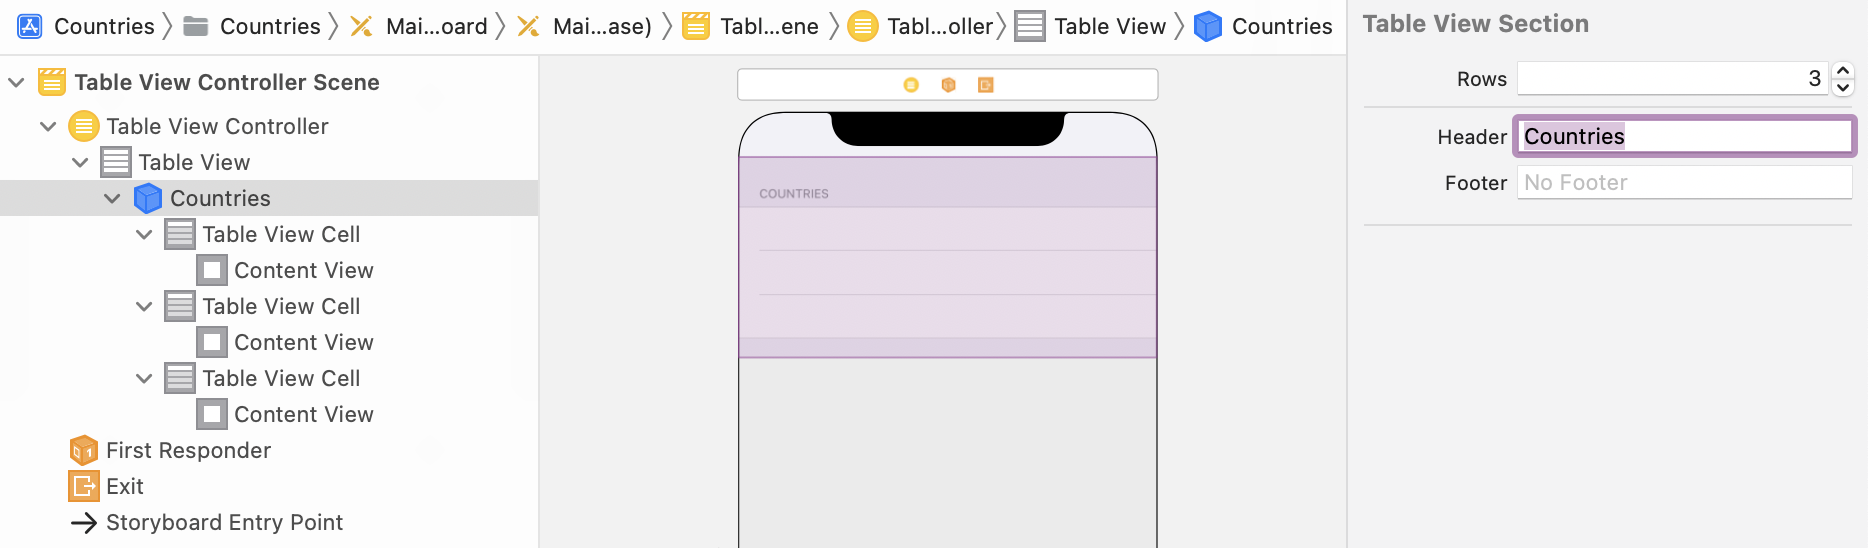
-
Select the cells by Shift + clicking and configure Basic as Style for all cells. A Basic Cell has one Label by default:
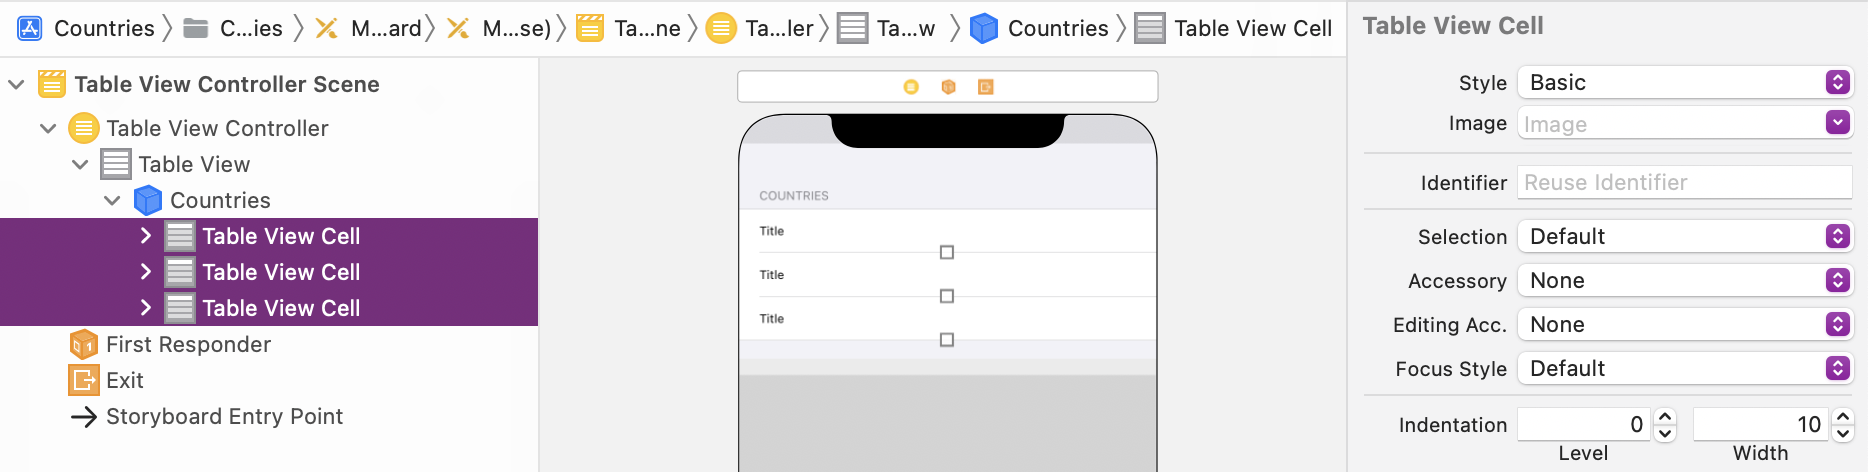
-
Set some country names as text for the cells:
-
Run the app with ⌘R.
Provide section and row content programmatically
-
Use the project from the previous steps or download a starter project here: Countries-static-cells.zip
-
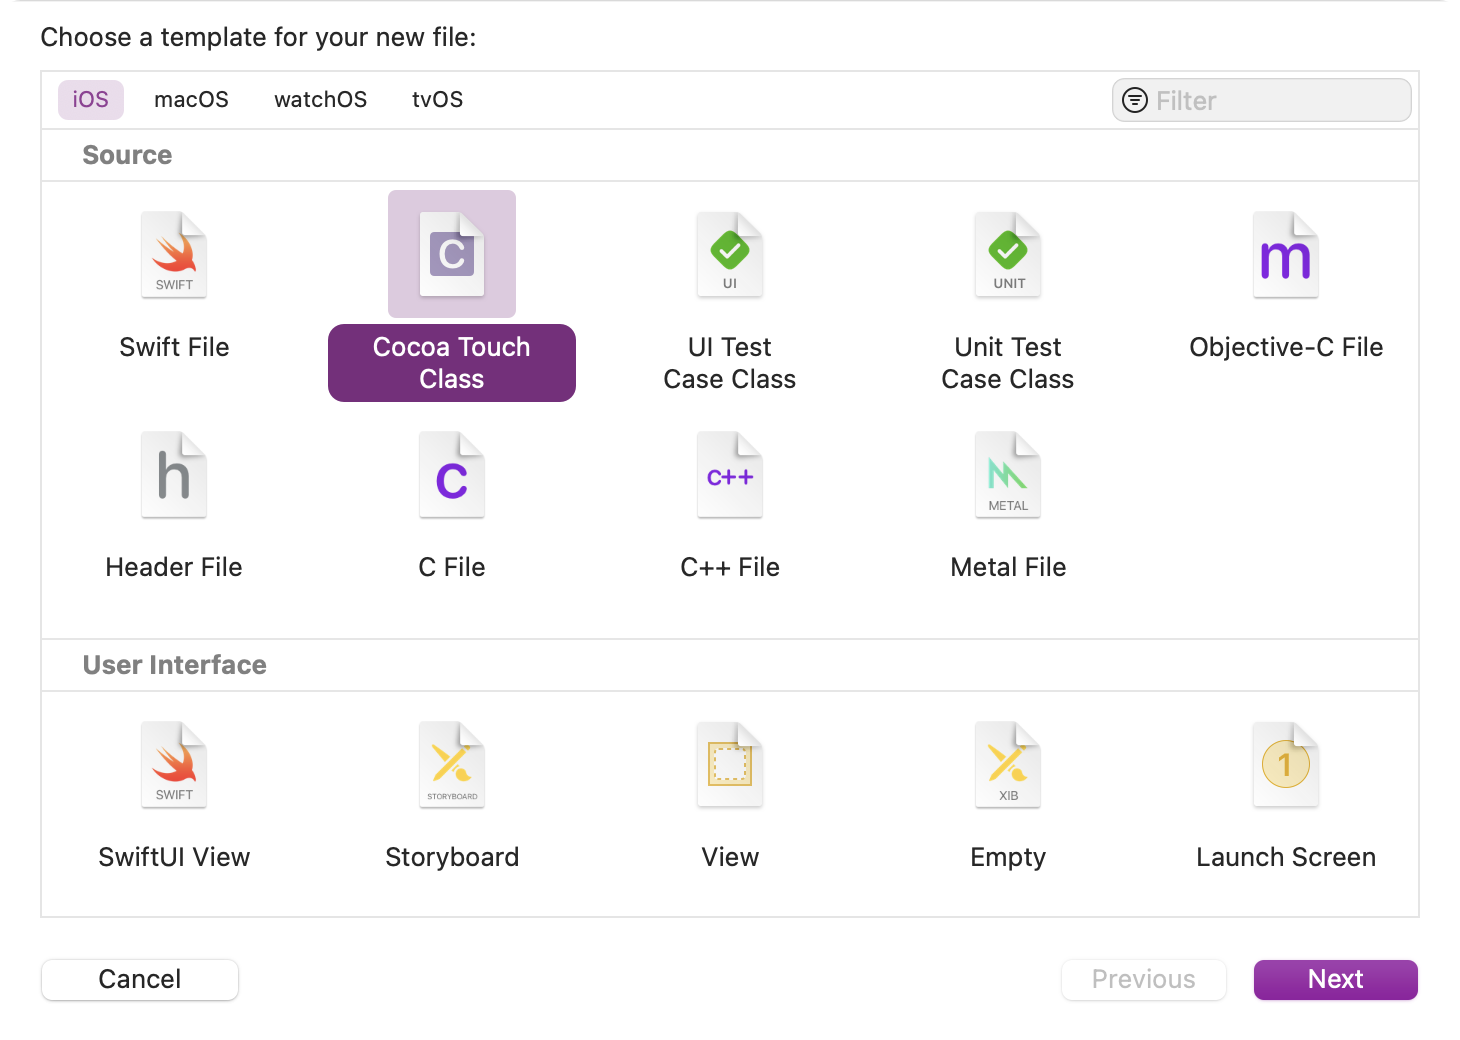
Use File » New » File ⌘N to create a new Cocoa Touch Class. Make sure that iOS is selected to create a source file for iOS:
-
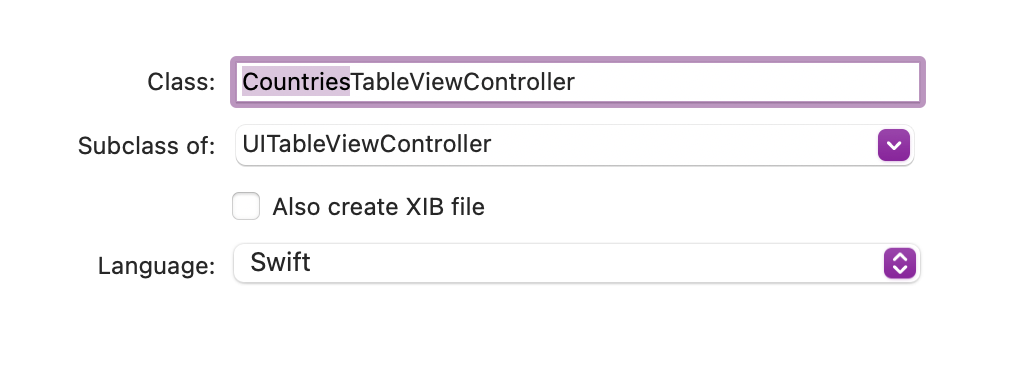
Create a subclass of UITableViewController in Swift and name it CountriesTableViewController:
-
Open the storyboard and set CountriesTableViewController as custom class for the Table View Controller:
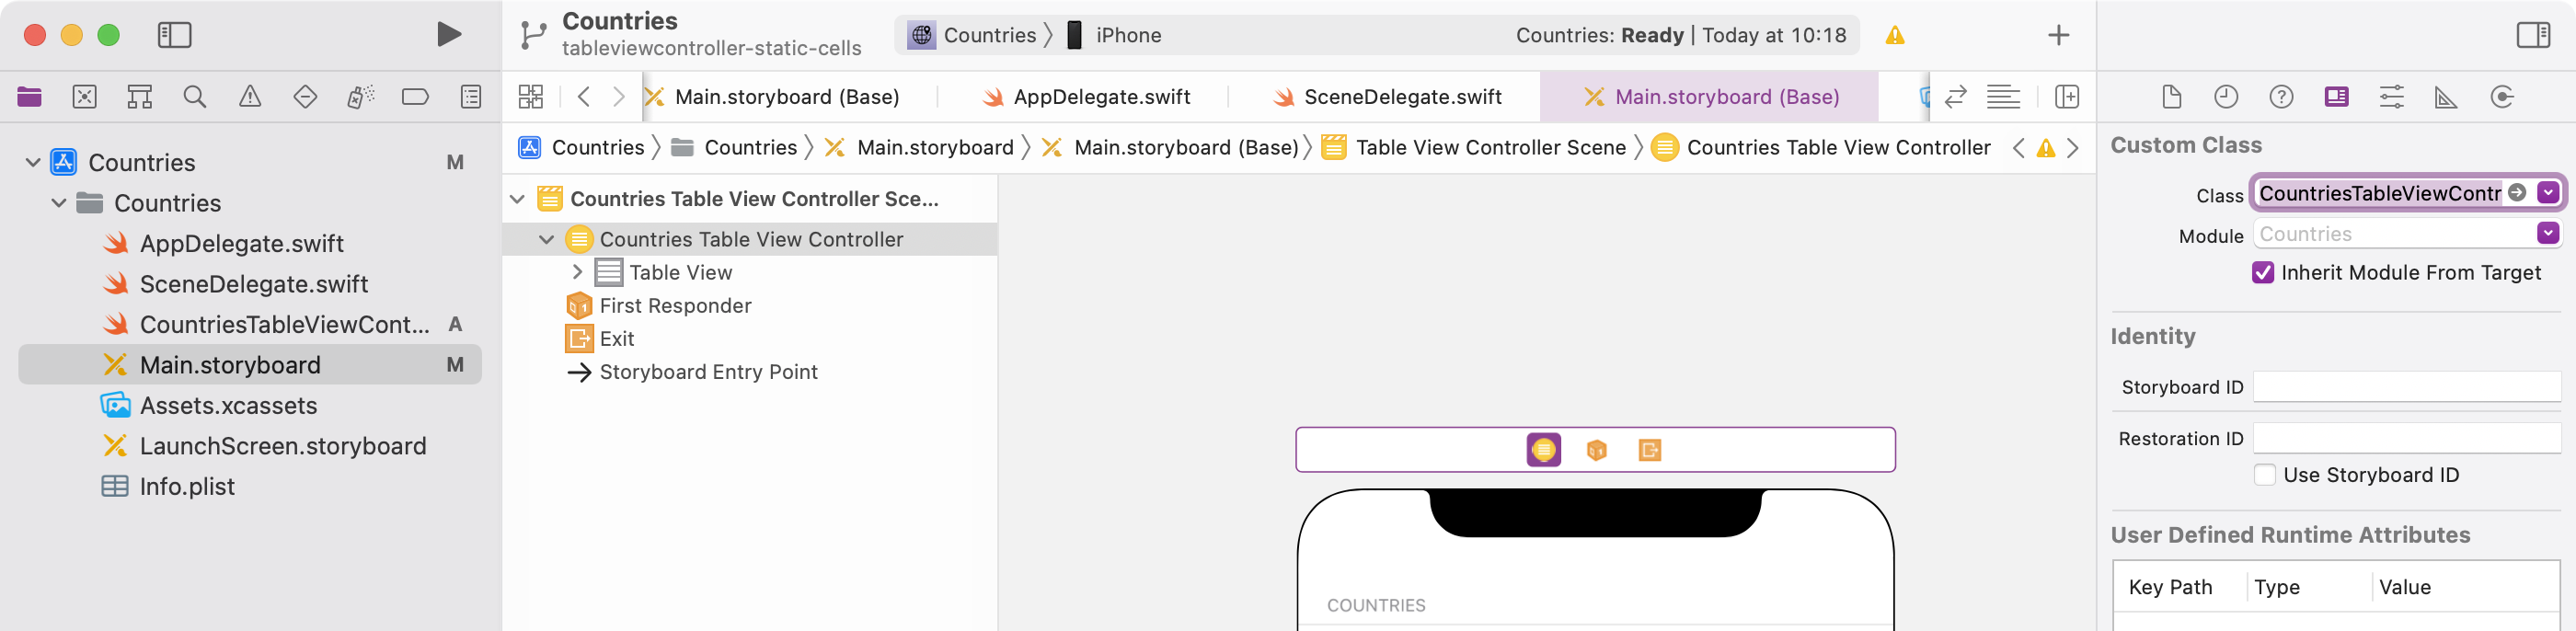
-
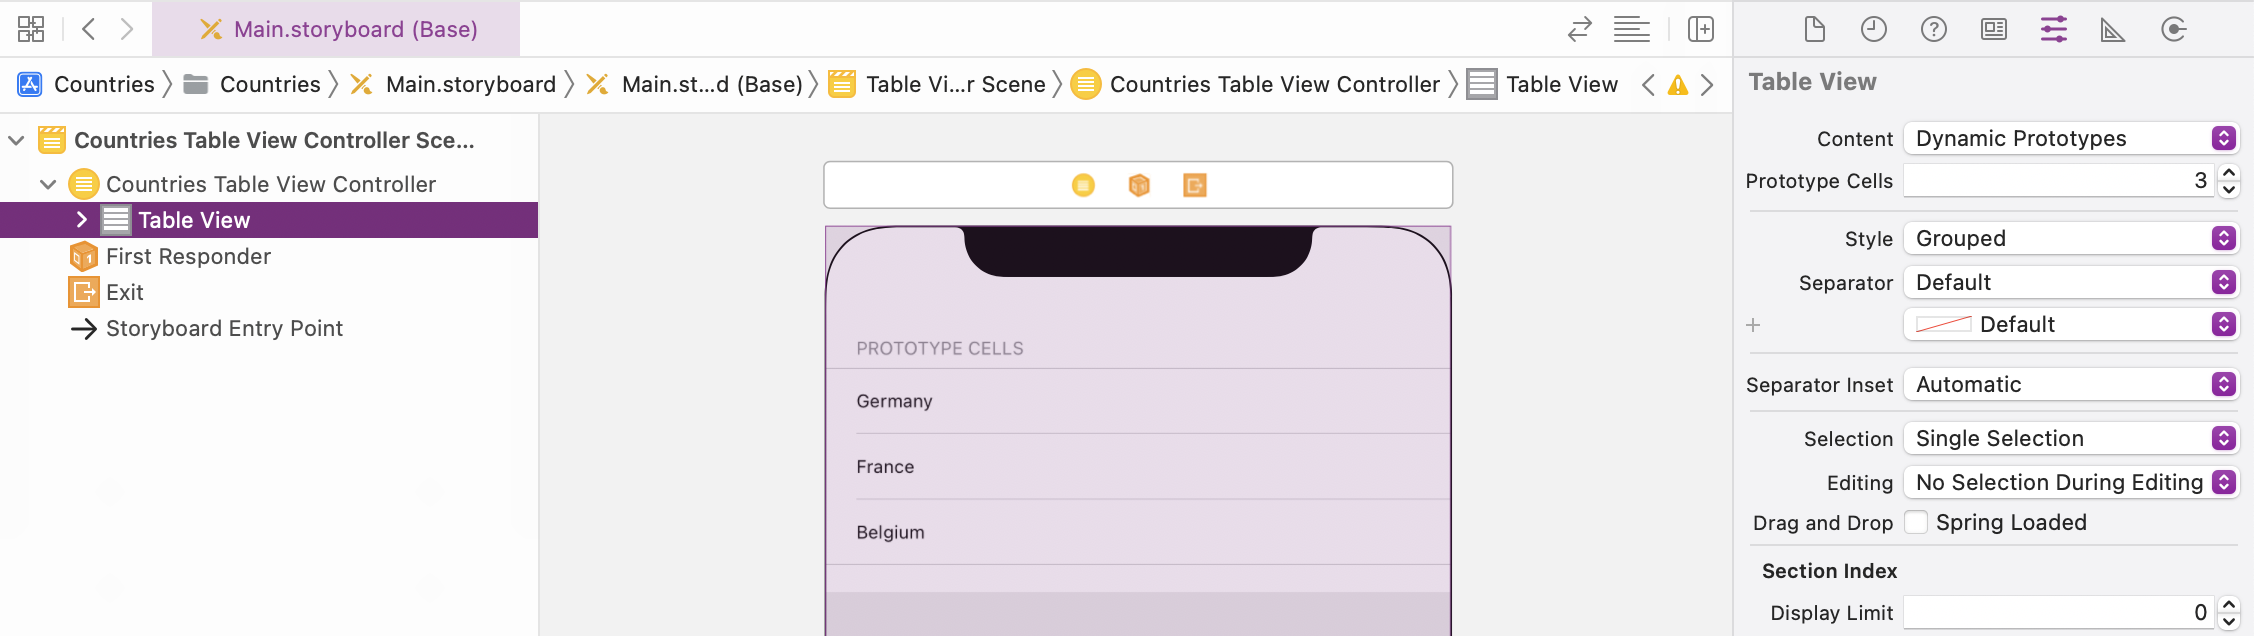
Select the Table View and configure Dynamic Prototypes for Content to define a prototype for the cells in the storyboard but to provide the content in the controller class. Configure 1 prototype cell and select Plain as Style:
-
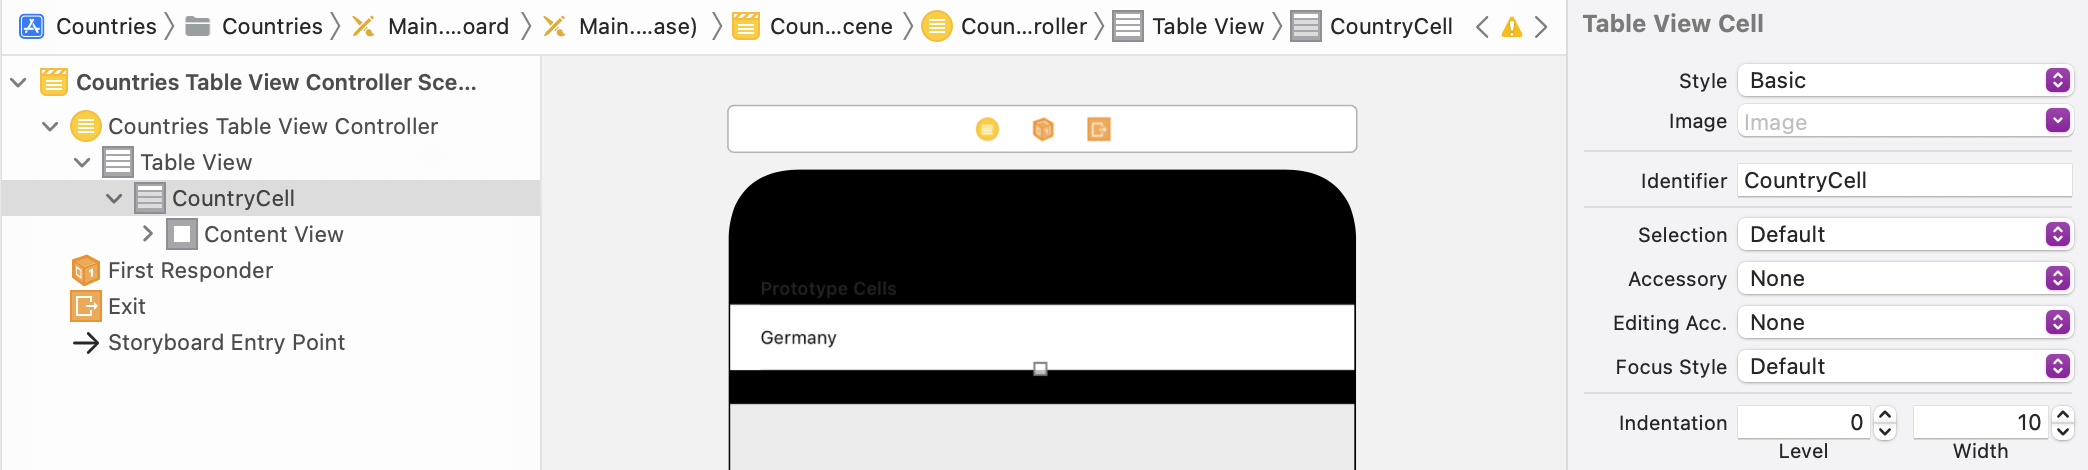
Select the Prototype cell and configure CountryCell as Identifier. The identifier is used in the controller implementation to create cells according to the prototype from the Storyboard:
-
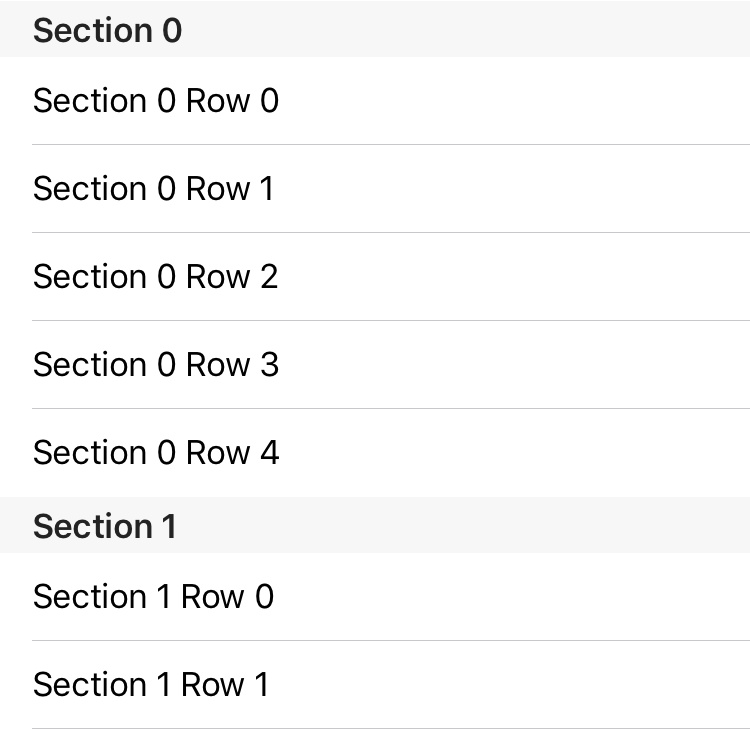
In the CountriesTableViewController class, customize the numberOfSectionsInTableView and tableView:numberOfRowsInSection: methods from the UITableViewDataSource protocol to return a fixed number of sections and rows and remove the #warning comments:
// MARK: - Table view data source

override func numberOfSections(in tableView: UITableView) -> Int {
    return 3
}

override func tableView(_ tableView: UITableView, numberOfRowsInSection section: Int) -> Int {
    return 5
}
-
Uncomment the tableView:cellForRowAtIndexPath: method in the controller class and customize it to create cells according to the Prototype cell and configure the cell text to show the section and row numbers:
override func tableView(_ tableView: UITableView, cellForRowAt indexPath: IndexPath) -> UITableViewCell {
    let cell = tableView.dequeueReusableCell(withIdentifier: "CountryCell", for: indexPath)

    cell.textLabel?.text = "Section \(indexPath.section) Row \(indexPath.row)"

    return cell
}
-
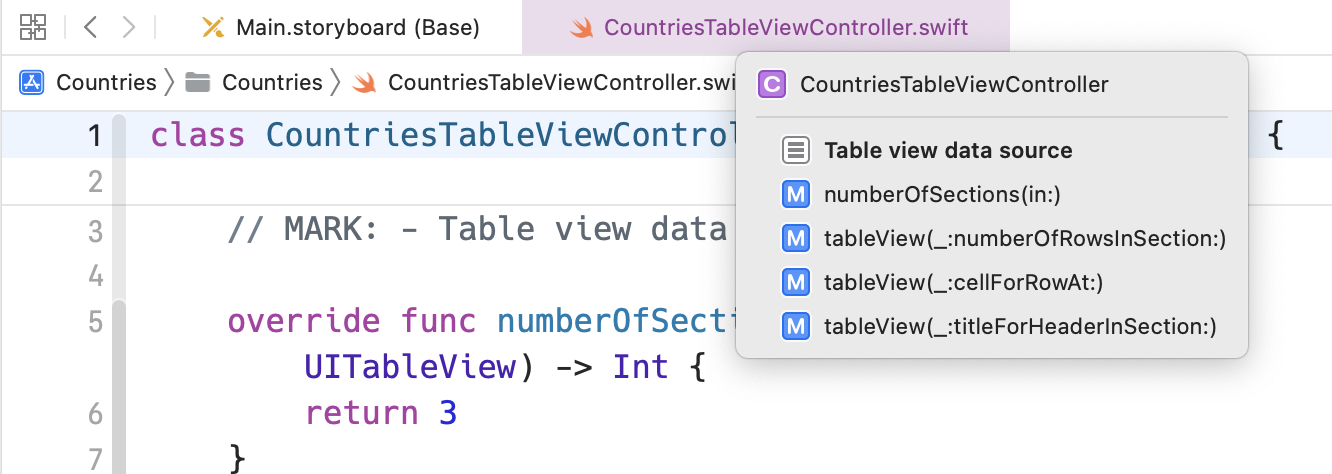
Overwrite the tableView:titleForHeaderInSection: method using the Xcode code completion:
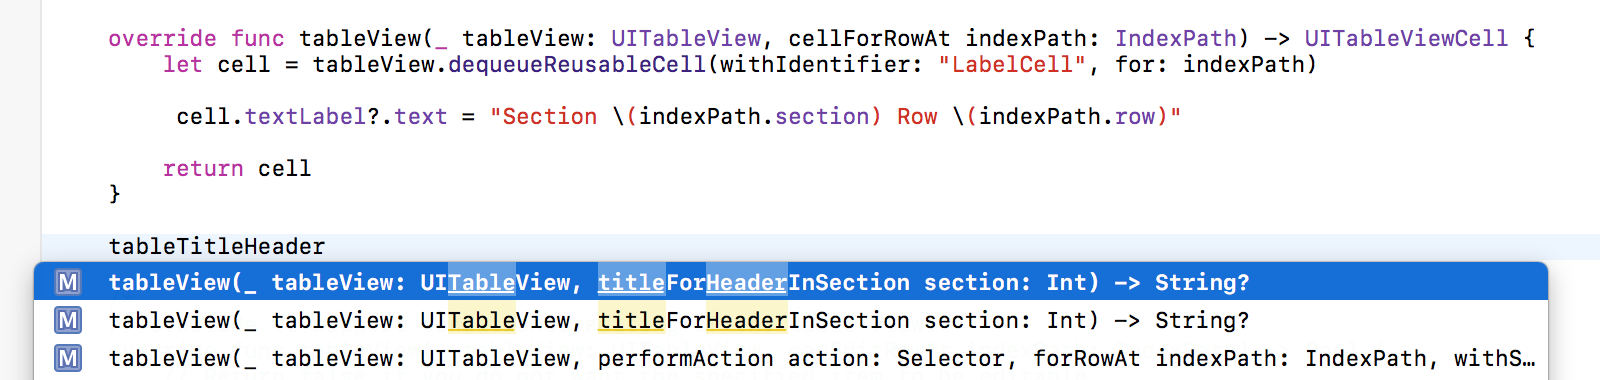
Implement the method to return a title according to the section number:
override func tableView(_ tableView: UITableView, titleForHeaderInSection section: Int) -> String? {
    return "Section \(section)"
}
-
Remove the remaining code in the class, this should be the code in the class:
import UIKit

class CountriesTableViewController: UITableViewController {

    // MARK: - Table view data source

    override func numberOfSections(in tableView: UITableView) -> Int {
        return 3
    }

    override func tableView(_ tableView: UITableView, numberOfRowsInSection section: Int) -> Int {
        return 5
    }

    override func tableView(_ tableView: UITableView, cellForRowAt indexPath: IndexPath) -> UITableViewCell {
        let cell = tableView.dequeueReusableCell(withIdentifier: "CountryCell", for: indexPath)

        cell.textLabel?.text = "Section \(indexPath.section) Row \(indexPath.row)"

        return cell
    }

    override func tableView(_ tableView: UITableView, titleForHeaderInSection section: Int) -> String? {
        return "Section \(section)"
    }

}
Hint: The “// MARK: ” comment groups the methods, for example when choosing a method from the Jump Bar:
-
Run the app with ⌘R:
Show data from a Swift Array
-
Use the project from the previous steps or download a starter project here: Countries-dynamic-prototypes.zip
-
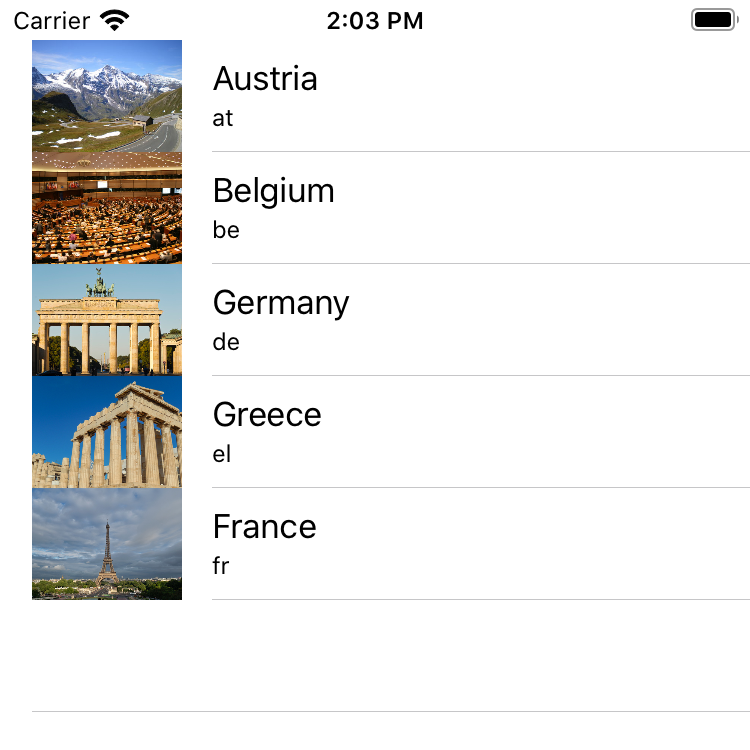
Add a type Country to hold some example data and add an Array with a few example countries to the CountriesTableViewController:
struct Country {
    var isoCode: String
    var name: String
}

class CountriesTableViewController: UITableViewController {

    let countries = [
    Country(isoCode: "at", name: "Austria"),
    Country(isoCode: "be", name: "Belgium"),
    Country(isoCode: "de", name: "Germany"),
    Country(isoCode: "el", name: "Greece"),
    Country(isoCode: "fr", name: "France"),
]

    // MARK: - Table view data source

}
-
Customize the CountriesTableViewController to use data from the Array:
class CountriesTableViewController: UITableViewController {

    // ...

    // MARK: - Table view data source

    override func numberOfSections(in tableView: UITableView) -> Int {
        return 1
    }

    override func tableView(_ tableView: UITableView, numberOfRowsInSection section: Int) -> Int {
        return countries.count
    }

    override func tableView(_ tableView: UITableView, cellForRowAt indexPath: IndexPath) -> UITableViewCell {
        let cell = tableView.dequeueReusableCell(withIdentifier: "CountryCell", for: indexPath)

        let country = countries[indexPath.row]
cell.textLabel?.text = country.name

        return cell
    }

}
Hint: You can also remove the numberOfSections method - by default tables have one section.
-
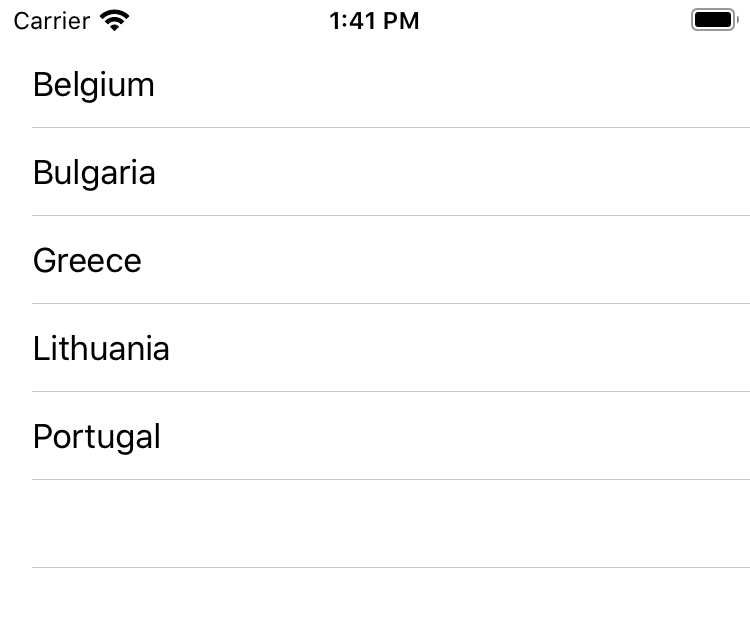
Run the app with ⌘R:
Configure cells using cell styles
-
Use the project from the previous steps or download a starter project here:
Countries-tableviewcontroller-swift-array.zip -
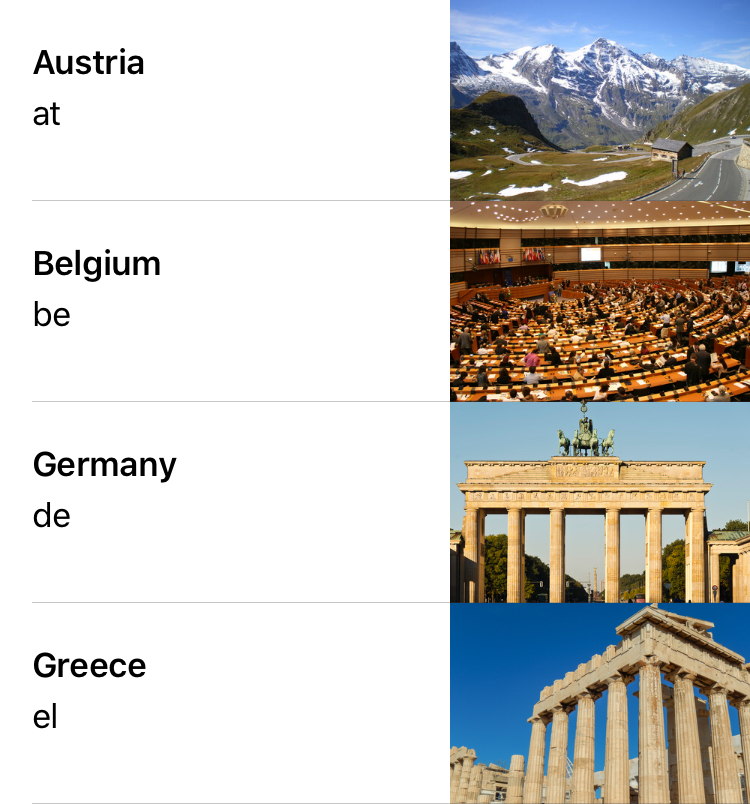
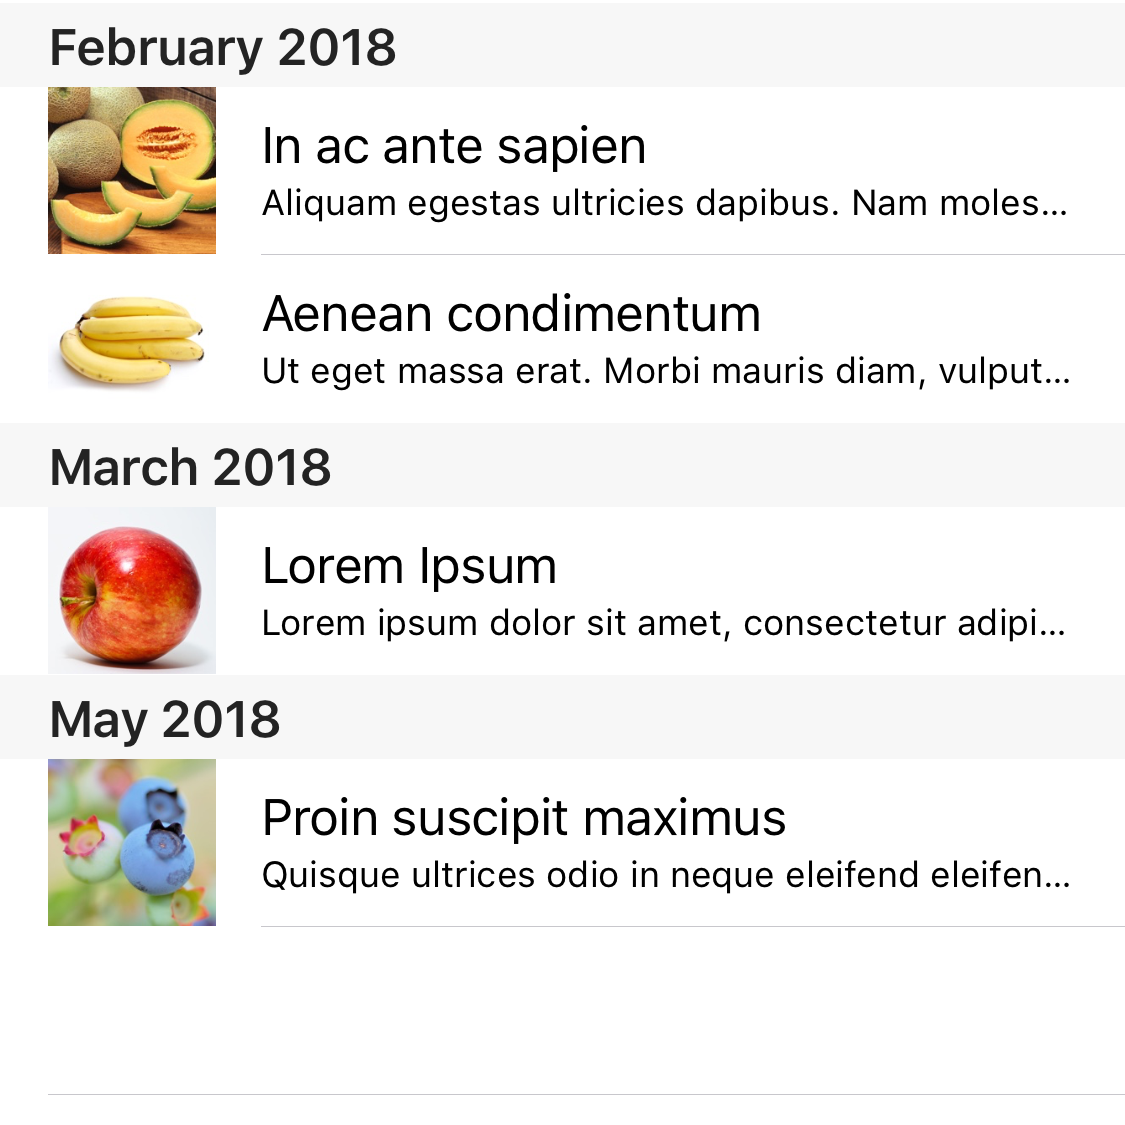
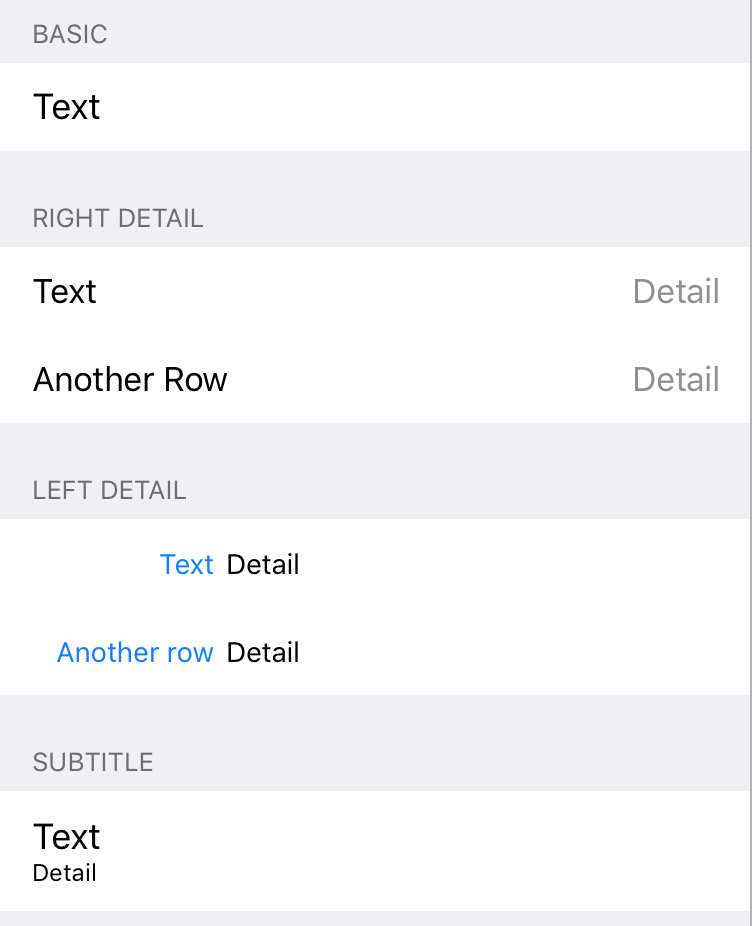
There are four different types of cell styles that have views out of the box - Basic, Left/Right Detail and Subtitle:
-
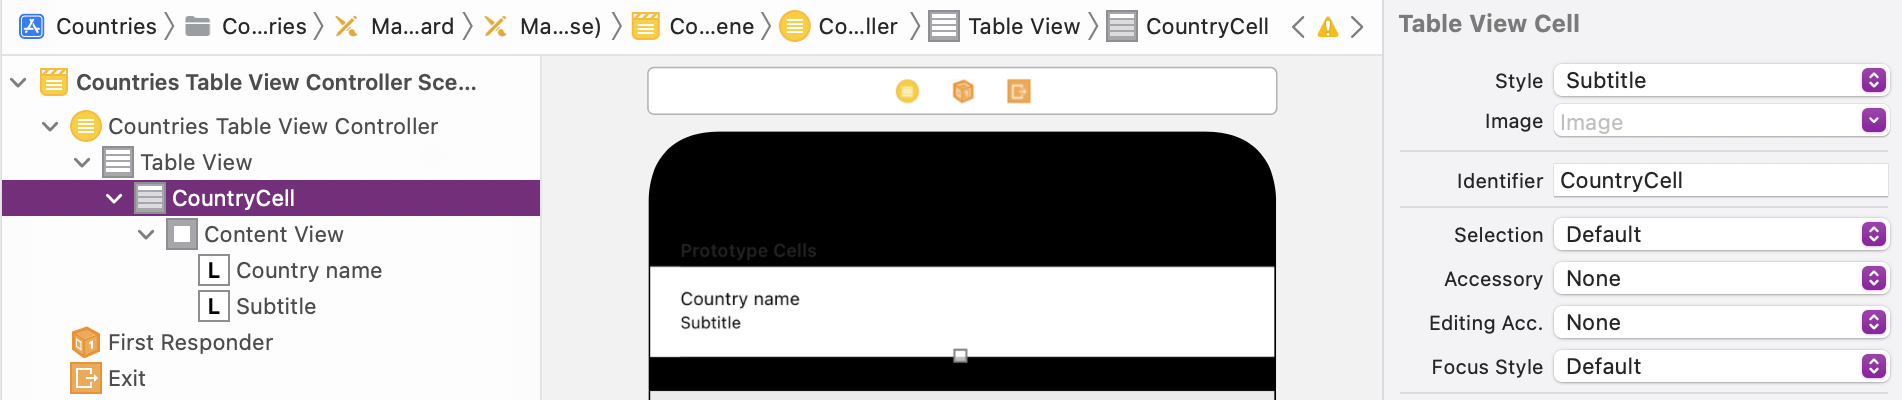
For the CountriesTableViewController in the storyboard, select the prototype cell and set the style Subtitle:
-
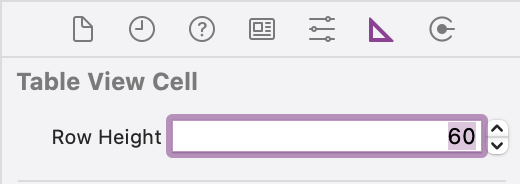
Set a row height of 60 for the cell:
-
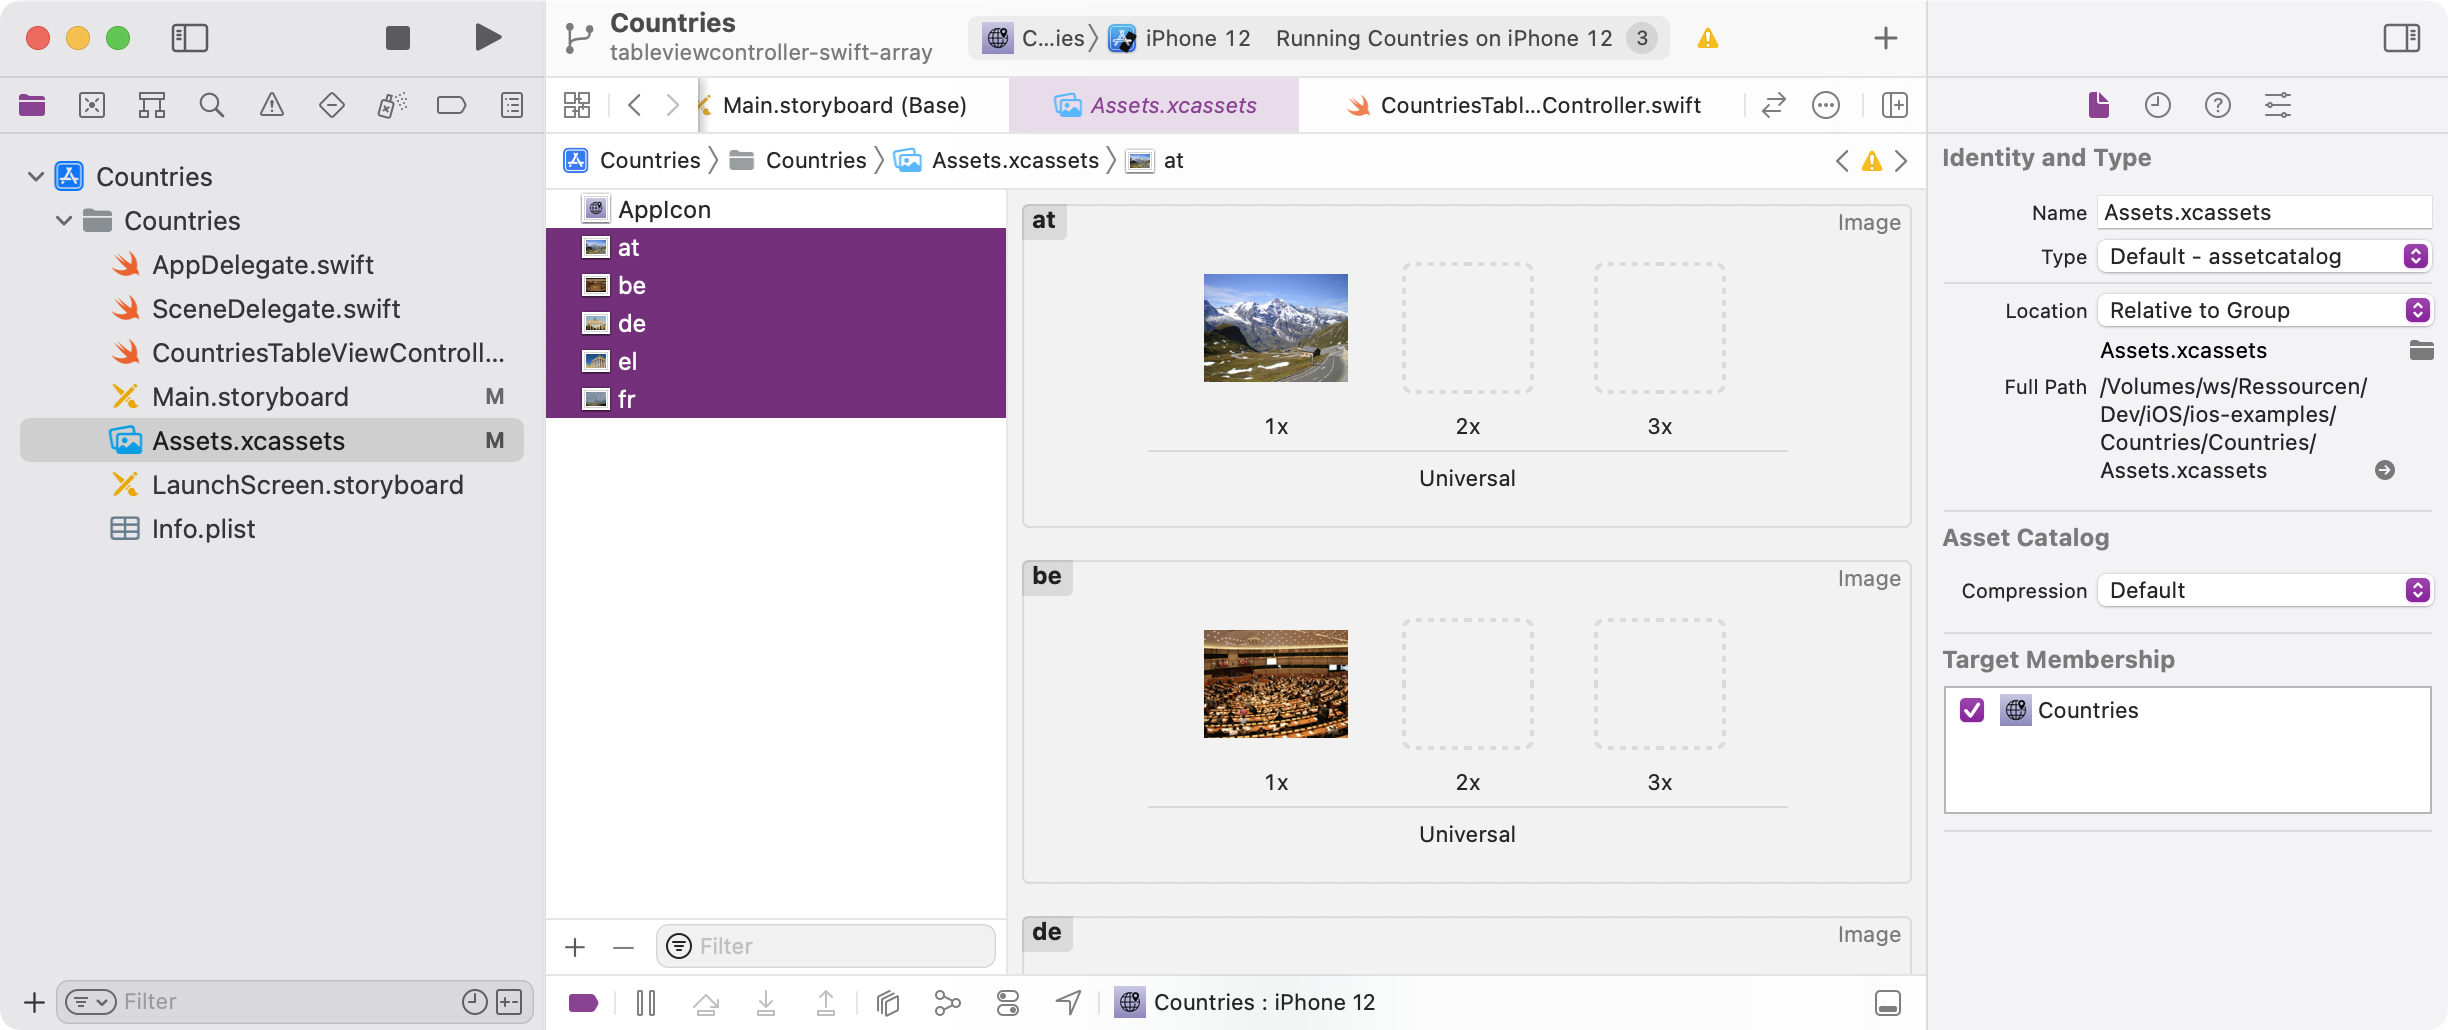
Download country-images.zip and drag the images to the Assets.xcassets in your project:
-
Extend the implementation of tableView(cellForRowAt:) in CountriesTableViewController to show a detail text and an image (all cells have an optional imageView that is created when the property is accessed):
class CountriesTableViewController: UITableViewController {

    ...

    override func tableView(_ tableView: UITableView, cellForRowAt indexPath: IndexPath) -> UITableViewCell {
        let cell = tableView.dequeueReusableCell(withIdentifier: "CountryCell", for: indexPath)

        let country = countries[indexPath.row]
        cell.textLabel?.text = country.name
        cell.detailTextLabel?.text = country.isoCode
cell.imageView?.image = UIImage(named: country.isoCode)

        return cell
    }

}
-
Run the app and check that the table looks correct:
More UITableViewController tutorials
Making table cells reorderable:
 Blog
Blog Subscribe
 Example project